Animiz Multi-track Timeline
Animiz multi-track timeline organizes objects using creative non-linear structure. This powerful timeline makes full use of backgrounds, cameras, captions, animations and recordings to liven up every details. Building beautiful, multimedia videos and gifs is just this easy.
Keyboard Shortcuts of Timeline
Ctrl + C: Copy
Ctrl + V: Paste
Ctrl + X: Cut
Ctrl + Z: Undo
Ctrl + Y: Redo
Delete: Delete
Shift/Ctrl: Multi-Select
Shift + C: Camera
Shift + B: Background
Shift + S: Subtitle
Shift + R: Record
Ctrl + K: Import Subtitle
Ctrl + P: Export Subtitle
Ctrl + M: Remove All Subtitles
Shift +M: Add a Tag
Shift+ Ctrl: Select Multiple Animations
Alt+ Left Mouse Button: Select Multiple Animations with Frame
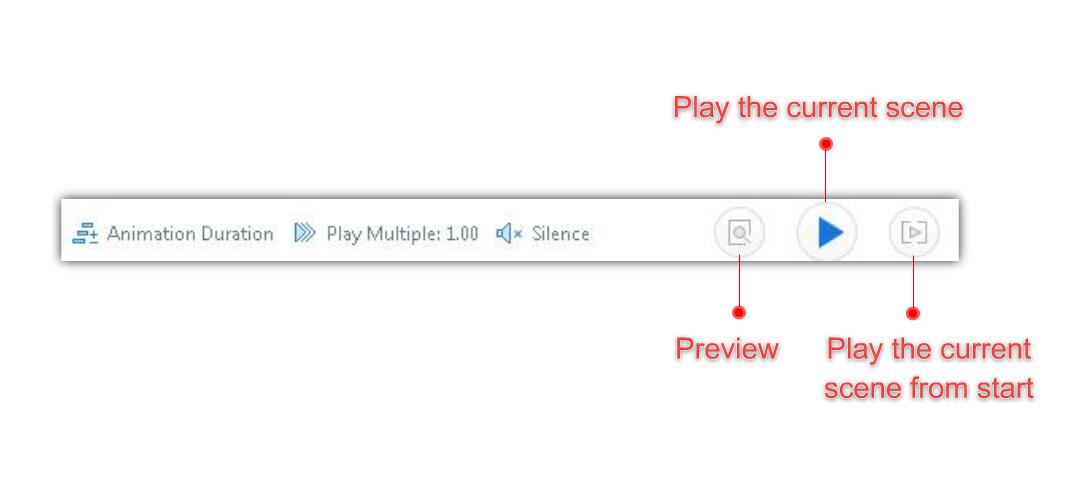
Space: Play the Current Scene
Ctrl + Shift + Space: Preview
Shift + Space: Play the Current Scene from Start
Alt + W: Add Animation
Alt + X: Delate Animation
Alt + C: Copy Animation
Alt + V: Paste Animation
Alt + Y: Insert Time Advanced Option
Alt + G: Time Alignment
Alt + H: Adjust Animation Effects overall
Alt + J: Enter in Sequence
Alt + K: Exit in Sequence
Multi-track Timeline Interface
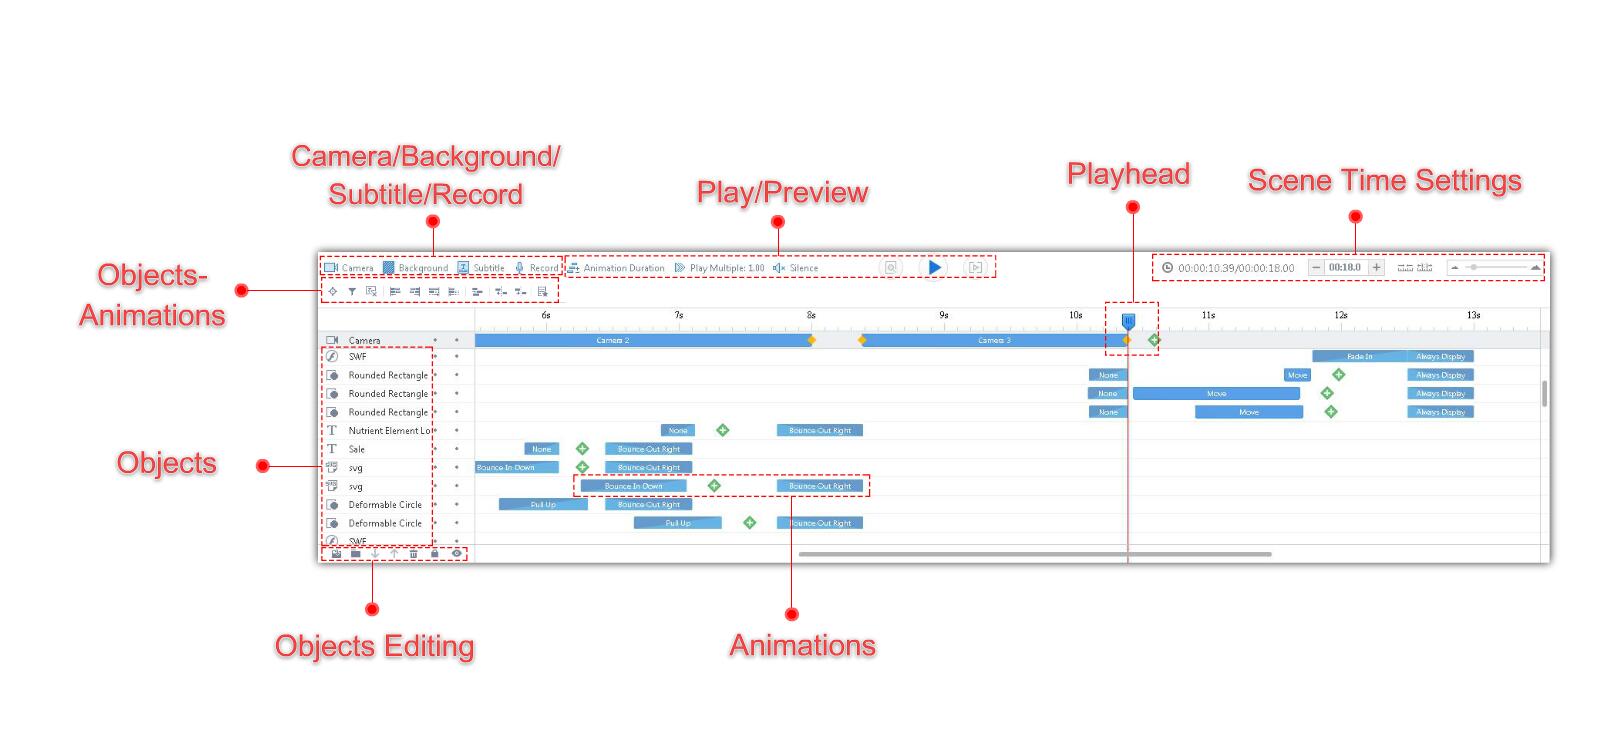
Animiz multi-track timeline interface is consist of 8 parts, including Camera/Background/Subtitle/Record, Play/Preview, Playhead, Scene Time Settings, Objects-Animations, Objects, Objects Editing and Animations.
Detailed Introduction of Animiz Timline
Ⅰ. Camera/Background/Subtitle/Record
Truly engage audiences with interactive video presentations. Adding cameras, backgrounds, subtitles and recordings in videos will make all the pieces fit together perfectly.

ⅰ. Camera
Give audiences amazing visual enjoyment with zooming, panning, rotating and moving cameras. More info visit: http://www.animiz.com/help-60.html.
ⅱ.Background
Customize image backgrounds or background colors to embellish scenes, making videos stylish and compelling.
Add scene background visit: http://www.animiz.com/help-63.html, customize scene background color visit: http://www.animiz.com/help-64.html.
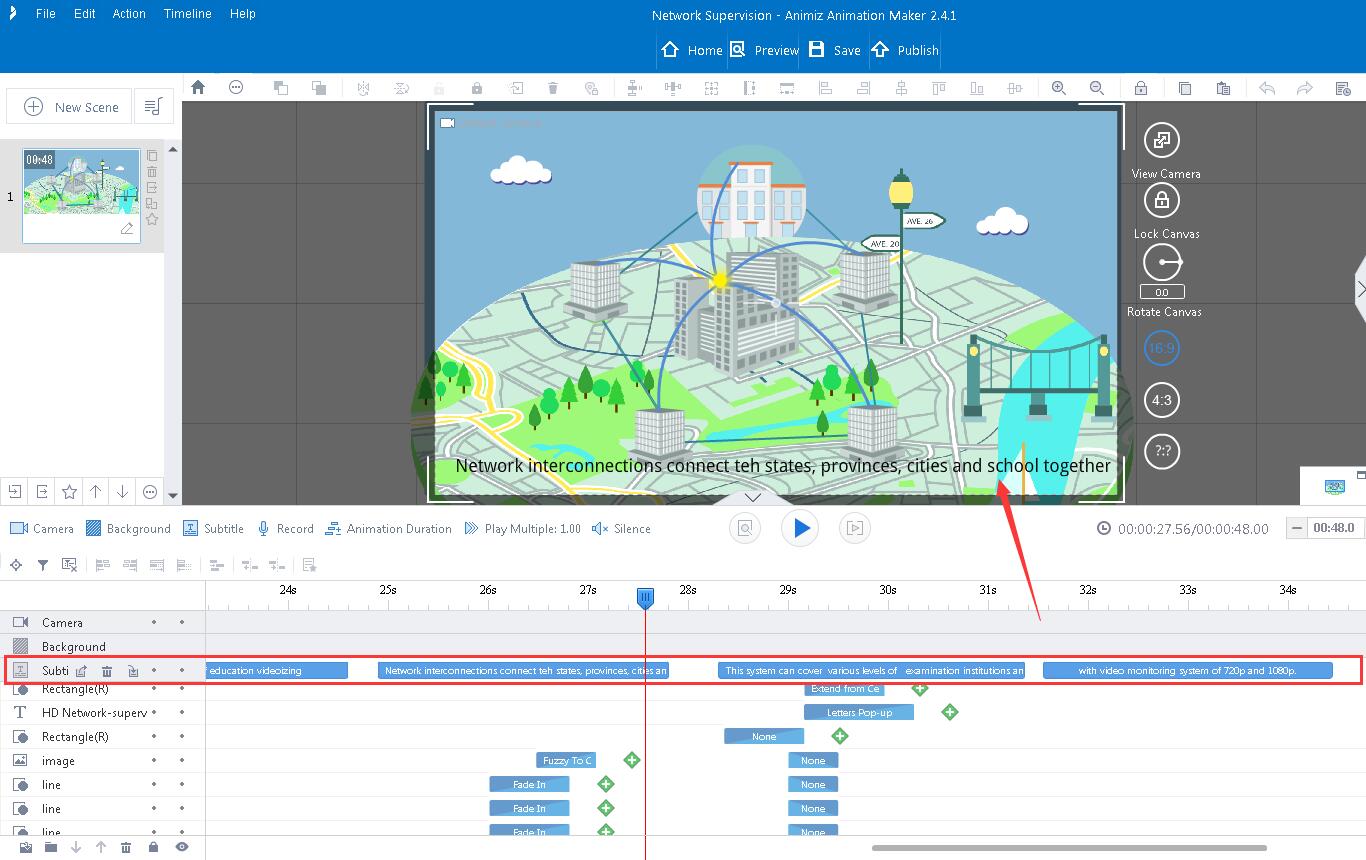
ⅲ. Subtitle
Adding subtitles in videos will make expressions clearer and richer, audiences therefore can better understand your points. Batch import and export subtitles supported. More info visit:
http://www.animiz.com/help-66.html.
ⅳ.Record
Make full use of your own recordings to tell stories resonantly. More info visit: http://www.animiz.com/help-80.html.
Ⅱ. Play/Preview
For gorgeous video results, you are inspired to edit animation duration and play multiple. Preview videos with Silence effect is advisable.
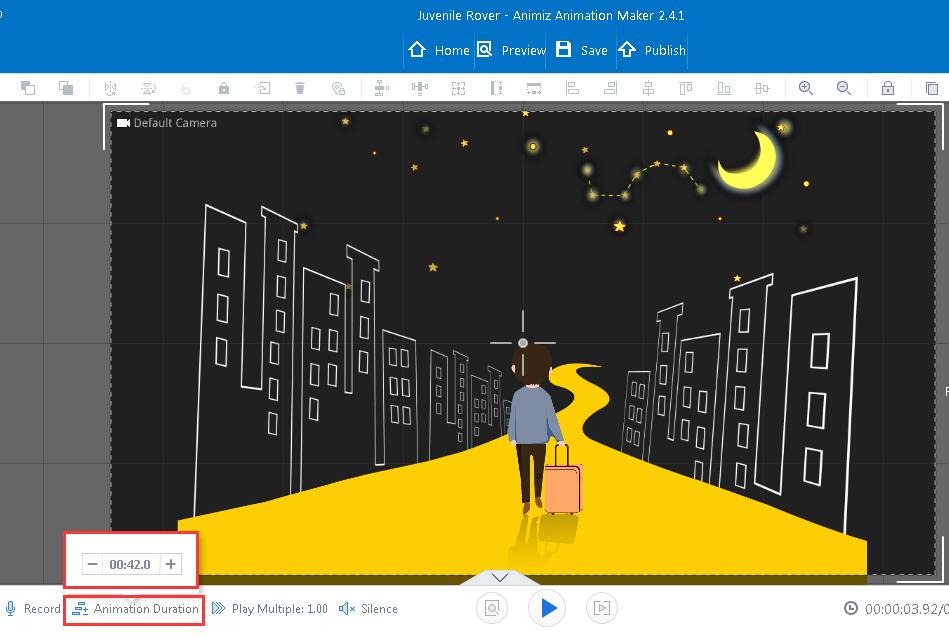
ⅰ.Animation Duration
Adjust scenes’ animation duration, scale all effects to scale according to current time.
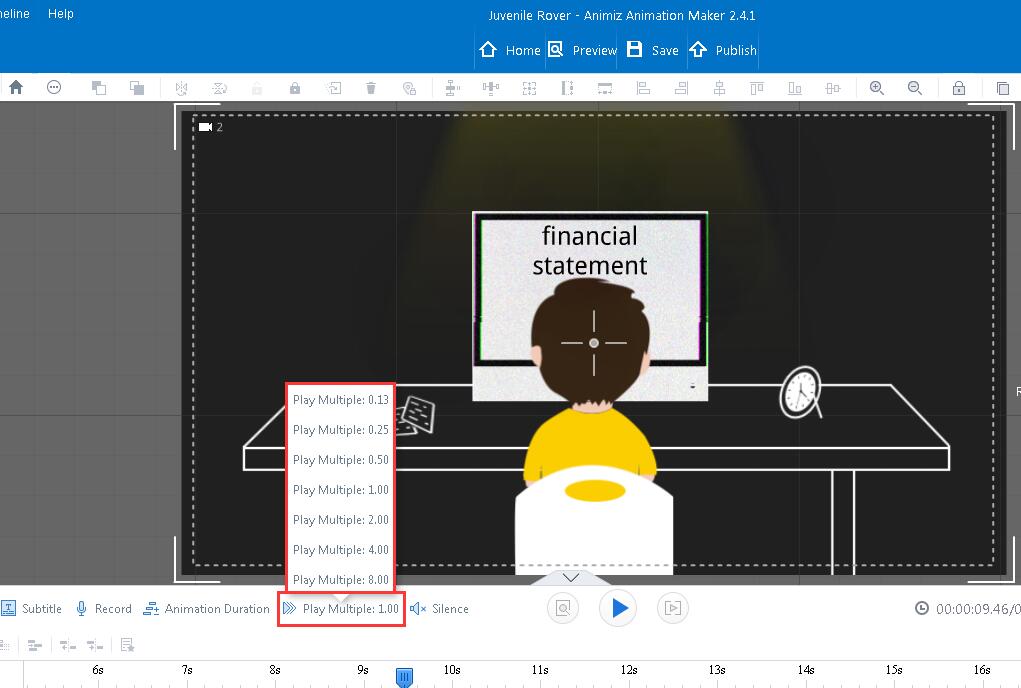
ⅱ.Play Multiple
Click to choose a suitable play speed to view videos. Speed up videos to get general information or slow down to specify details, it is for your selection.
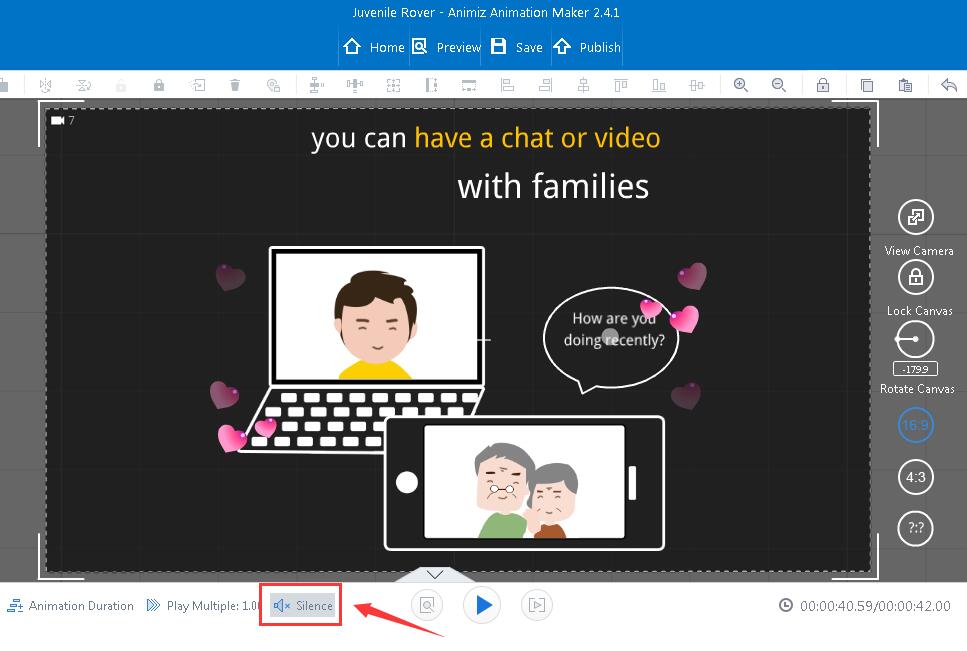
ⅲ.Silence
When add music files in video, click “Silence” button will make videos play in the mute state even you move the playhead in timeline.
Ⅲ. Playhead
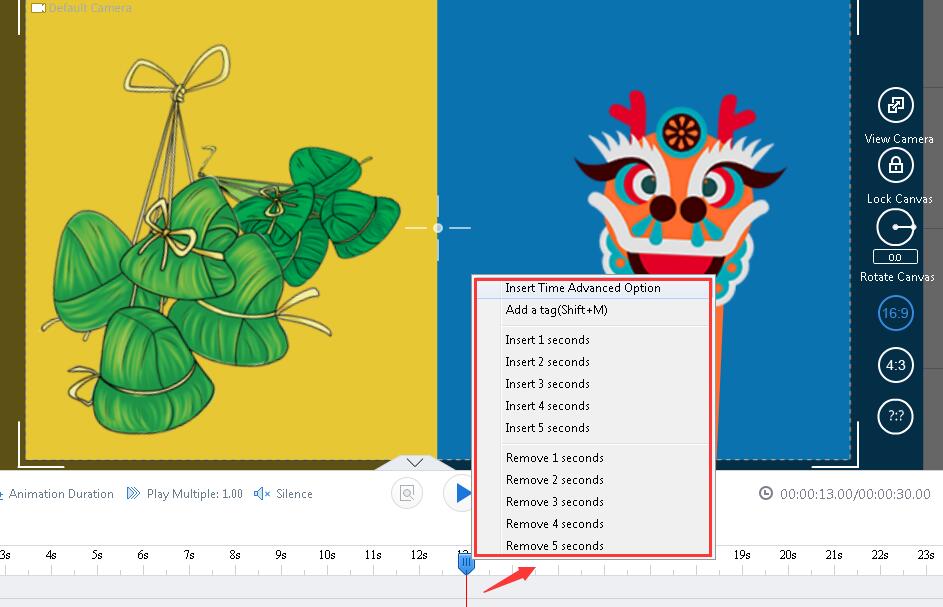
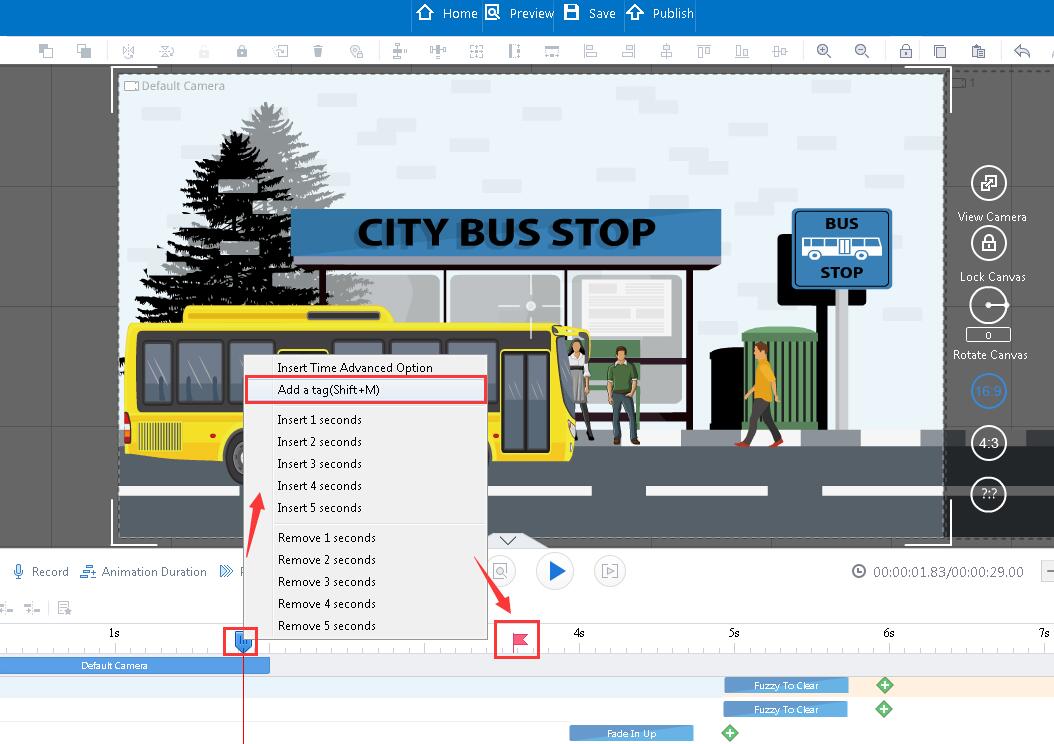
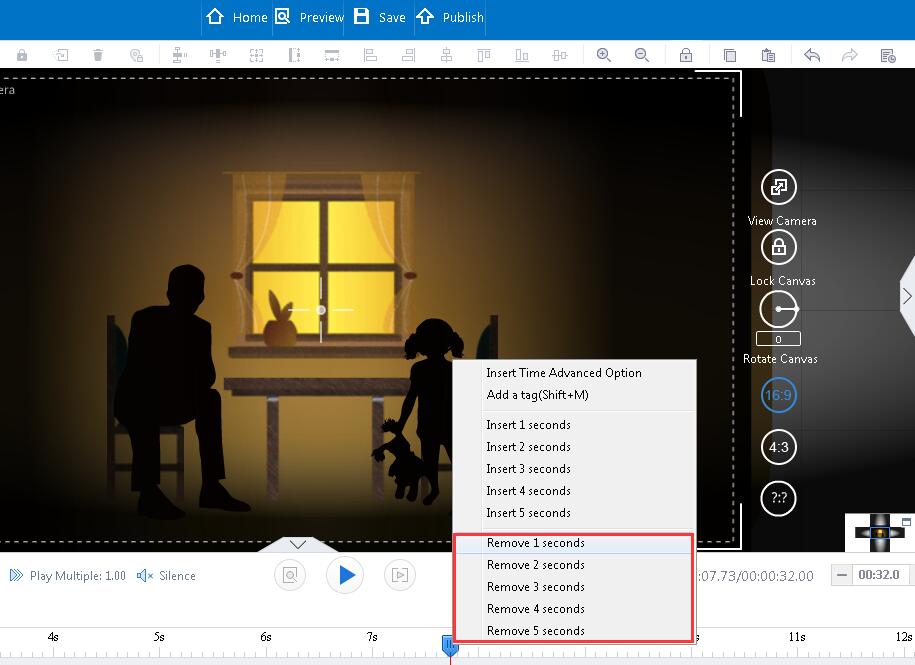
Animiz multi-track timeline enables you to have powerful playhead settings. Simply right click on the playhead, you can directly insert/remove seconds, or add a tag in timeline.
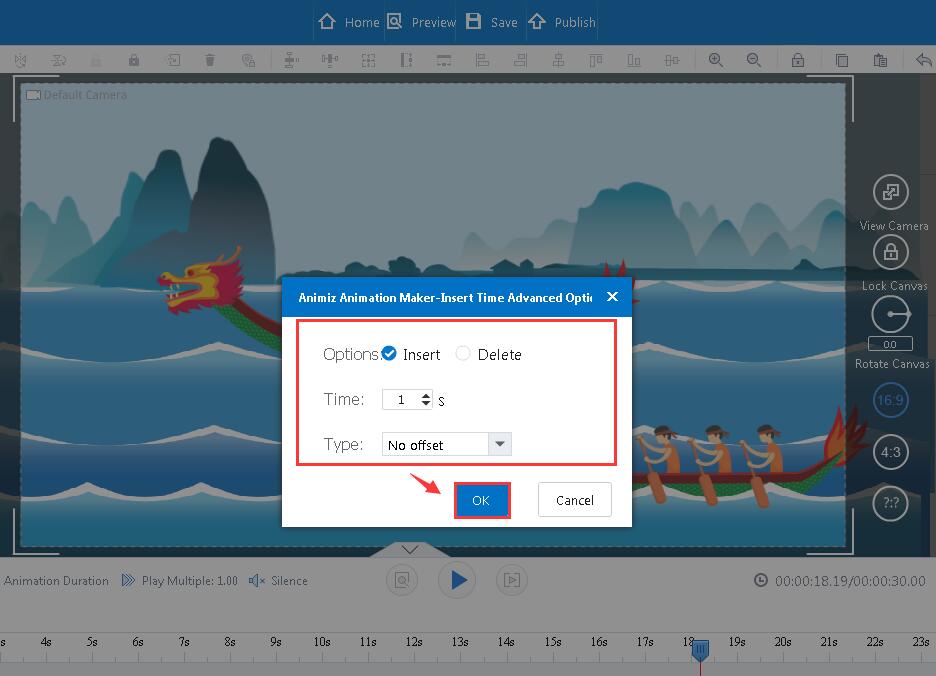
ⅰ.Insert Time Advance Option
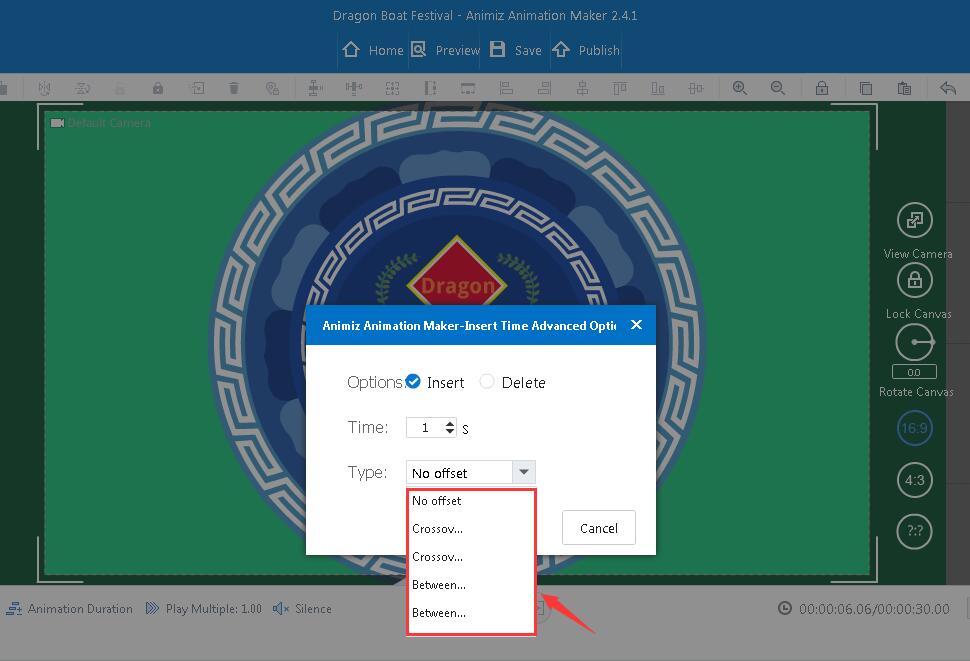
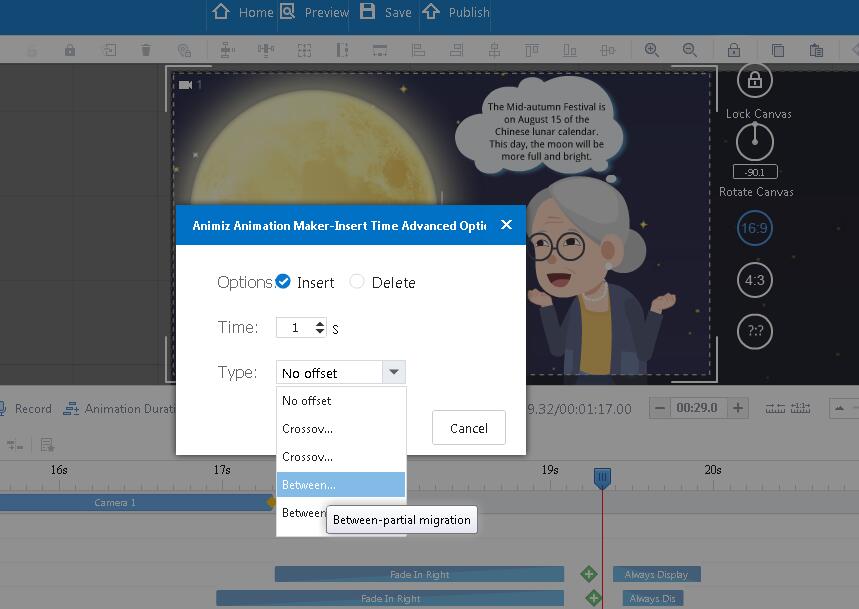
This advanced options enable you to choose whether insert or delete time in timeline. Insert/delete time and type are optional.
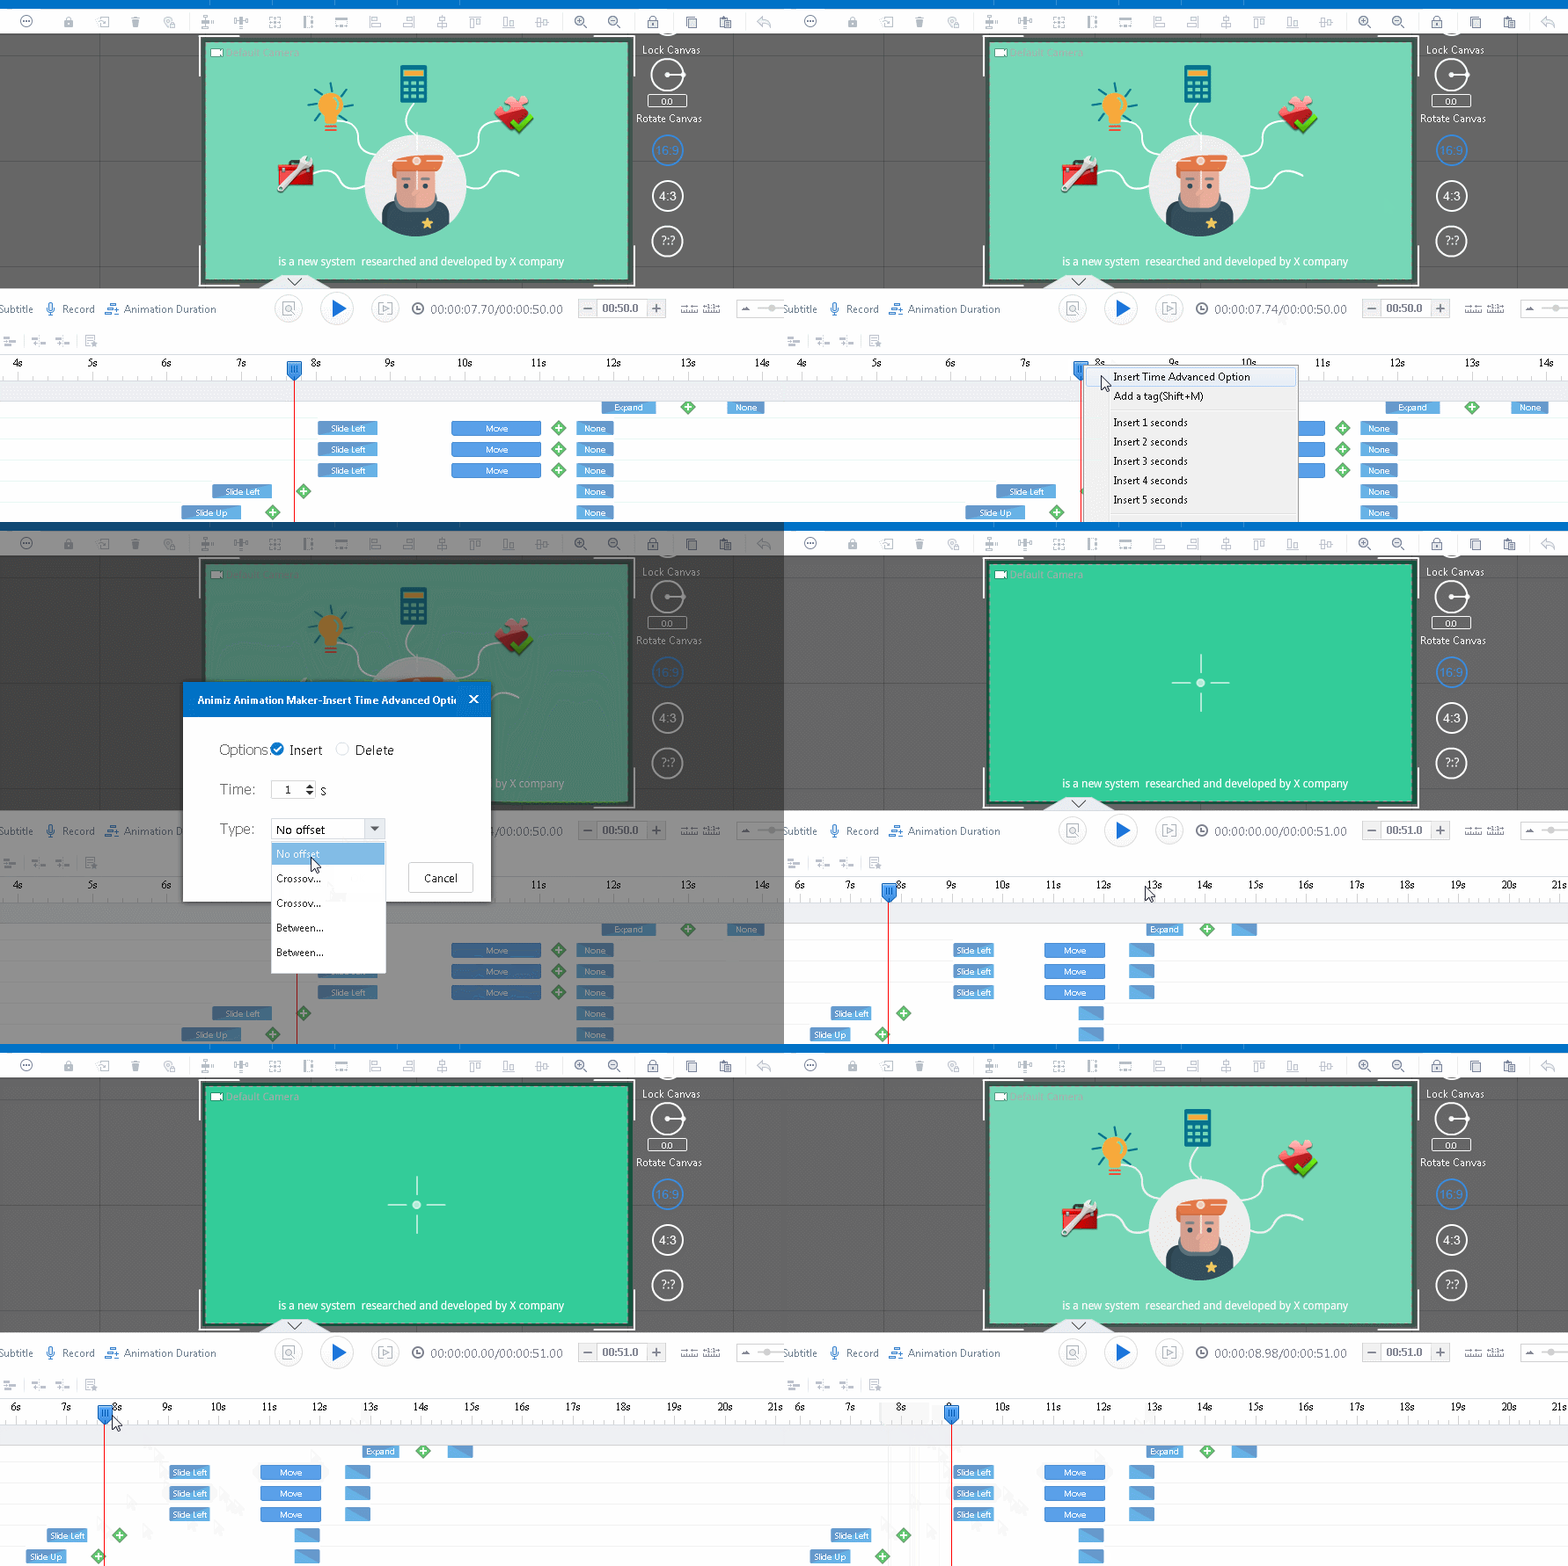
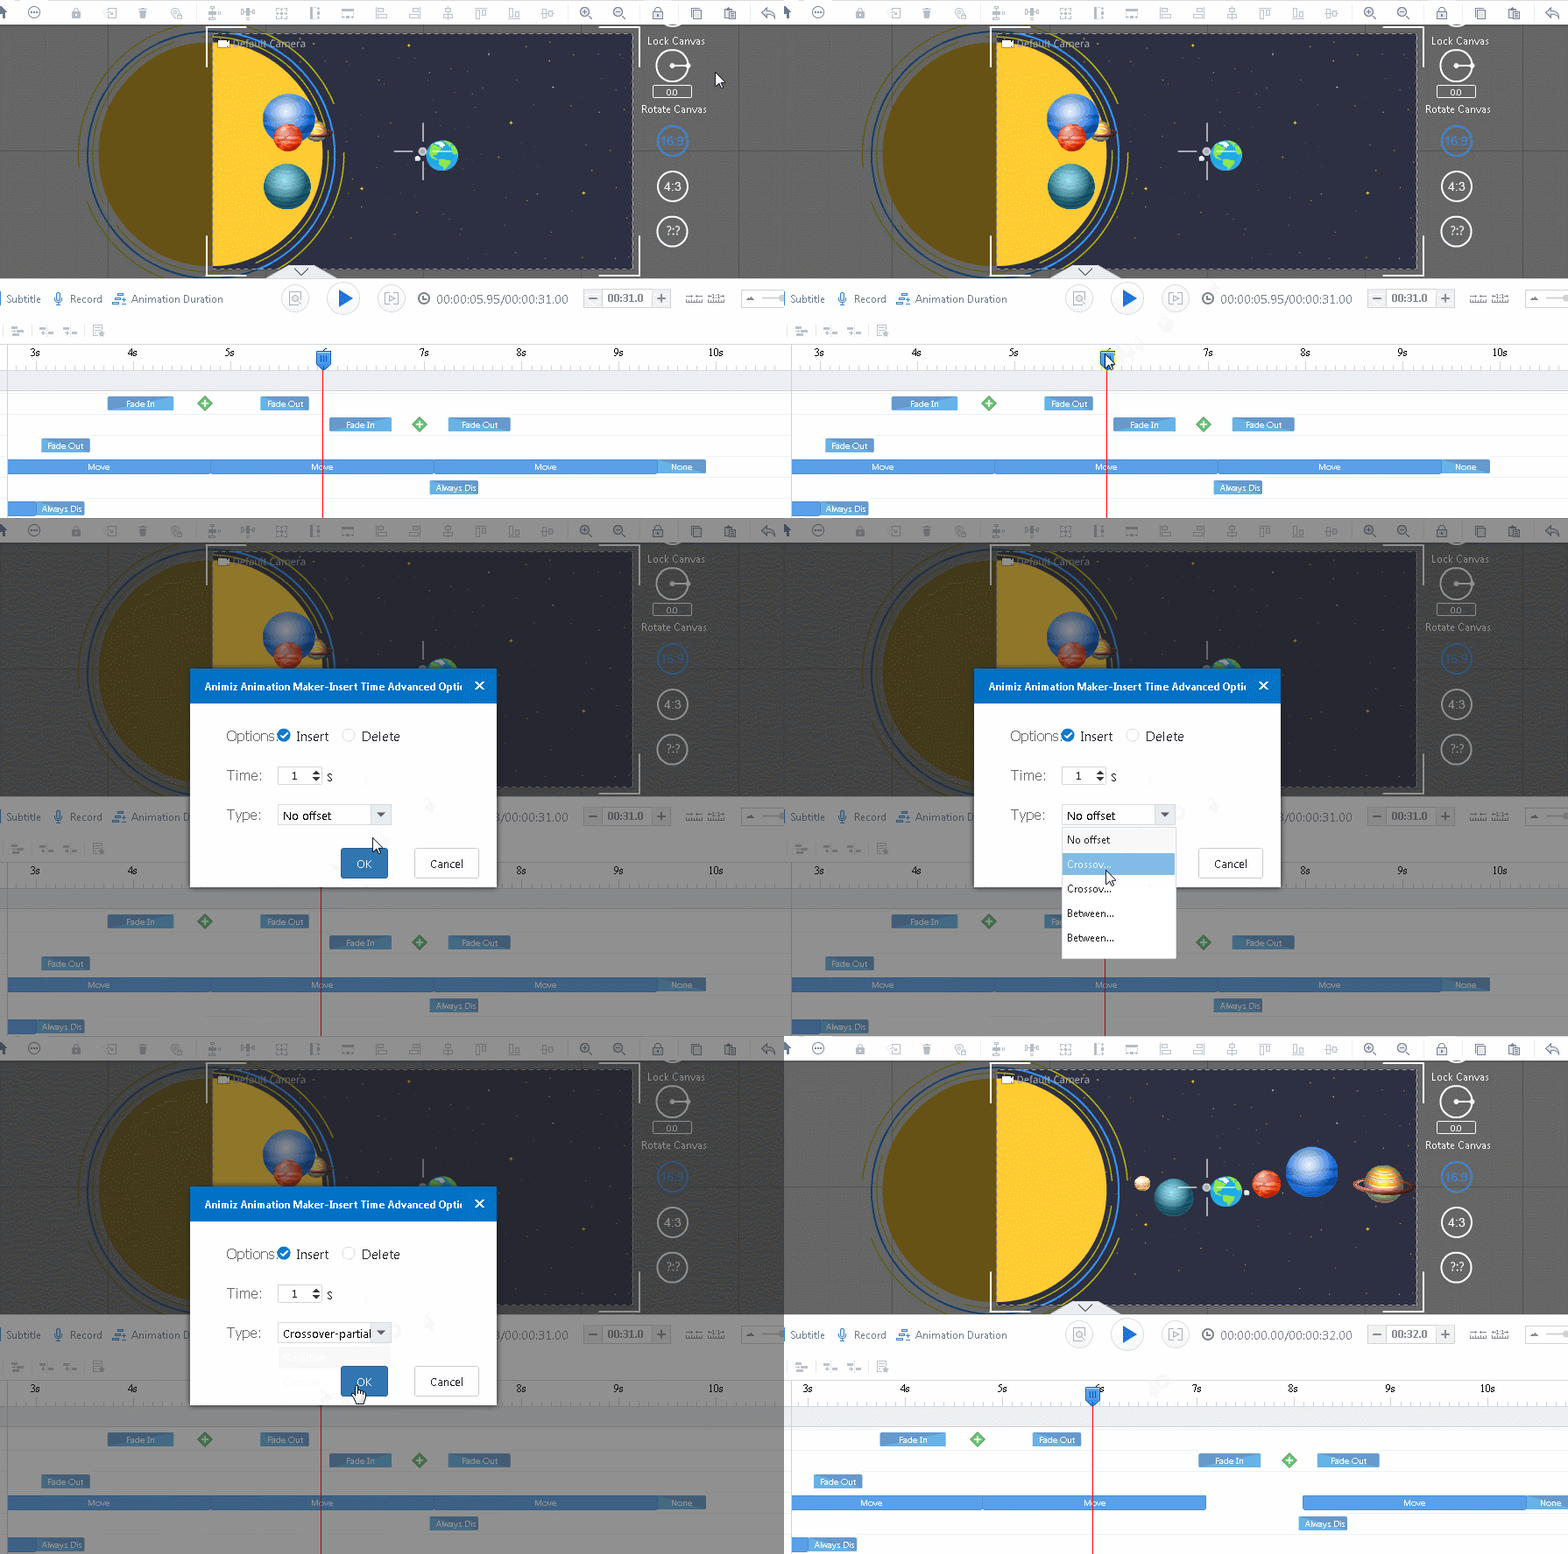
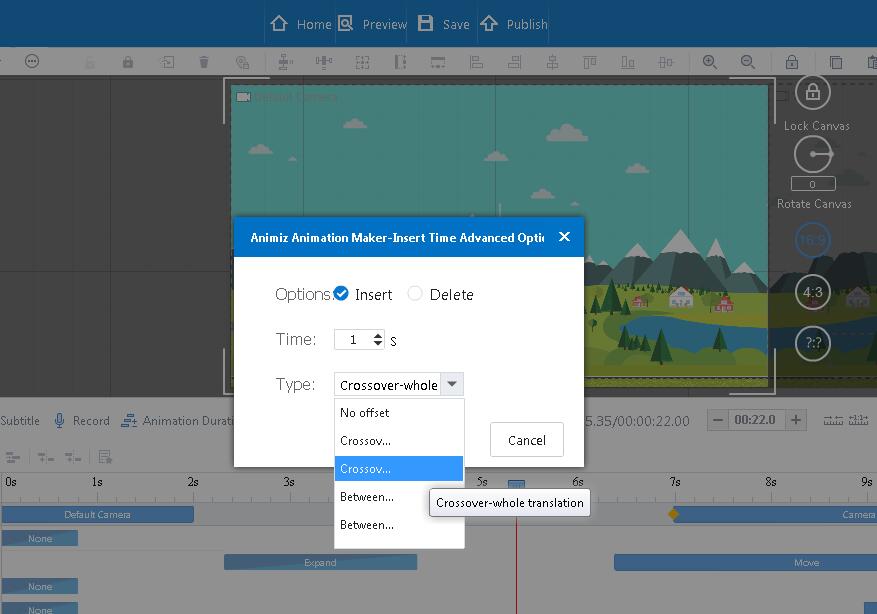
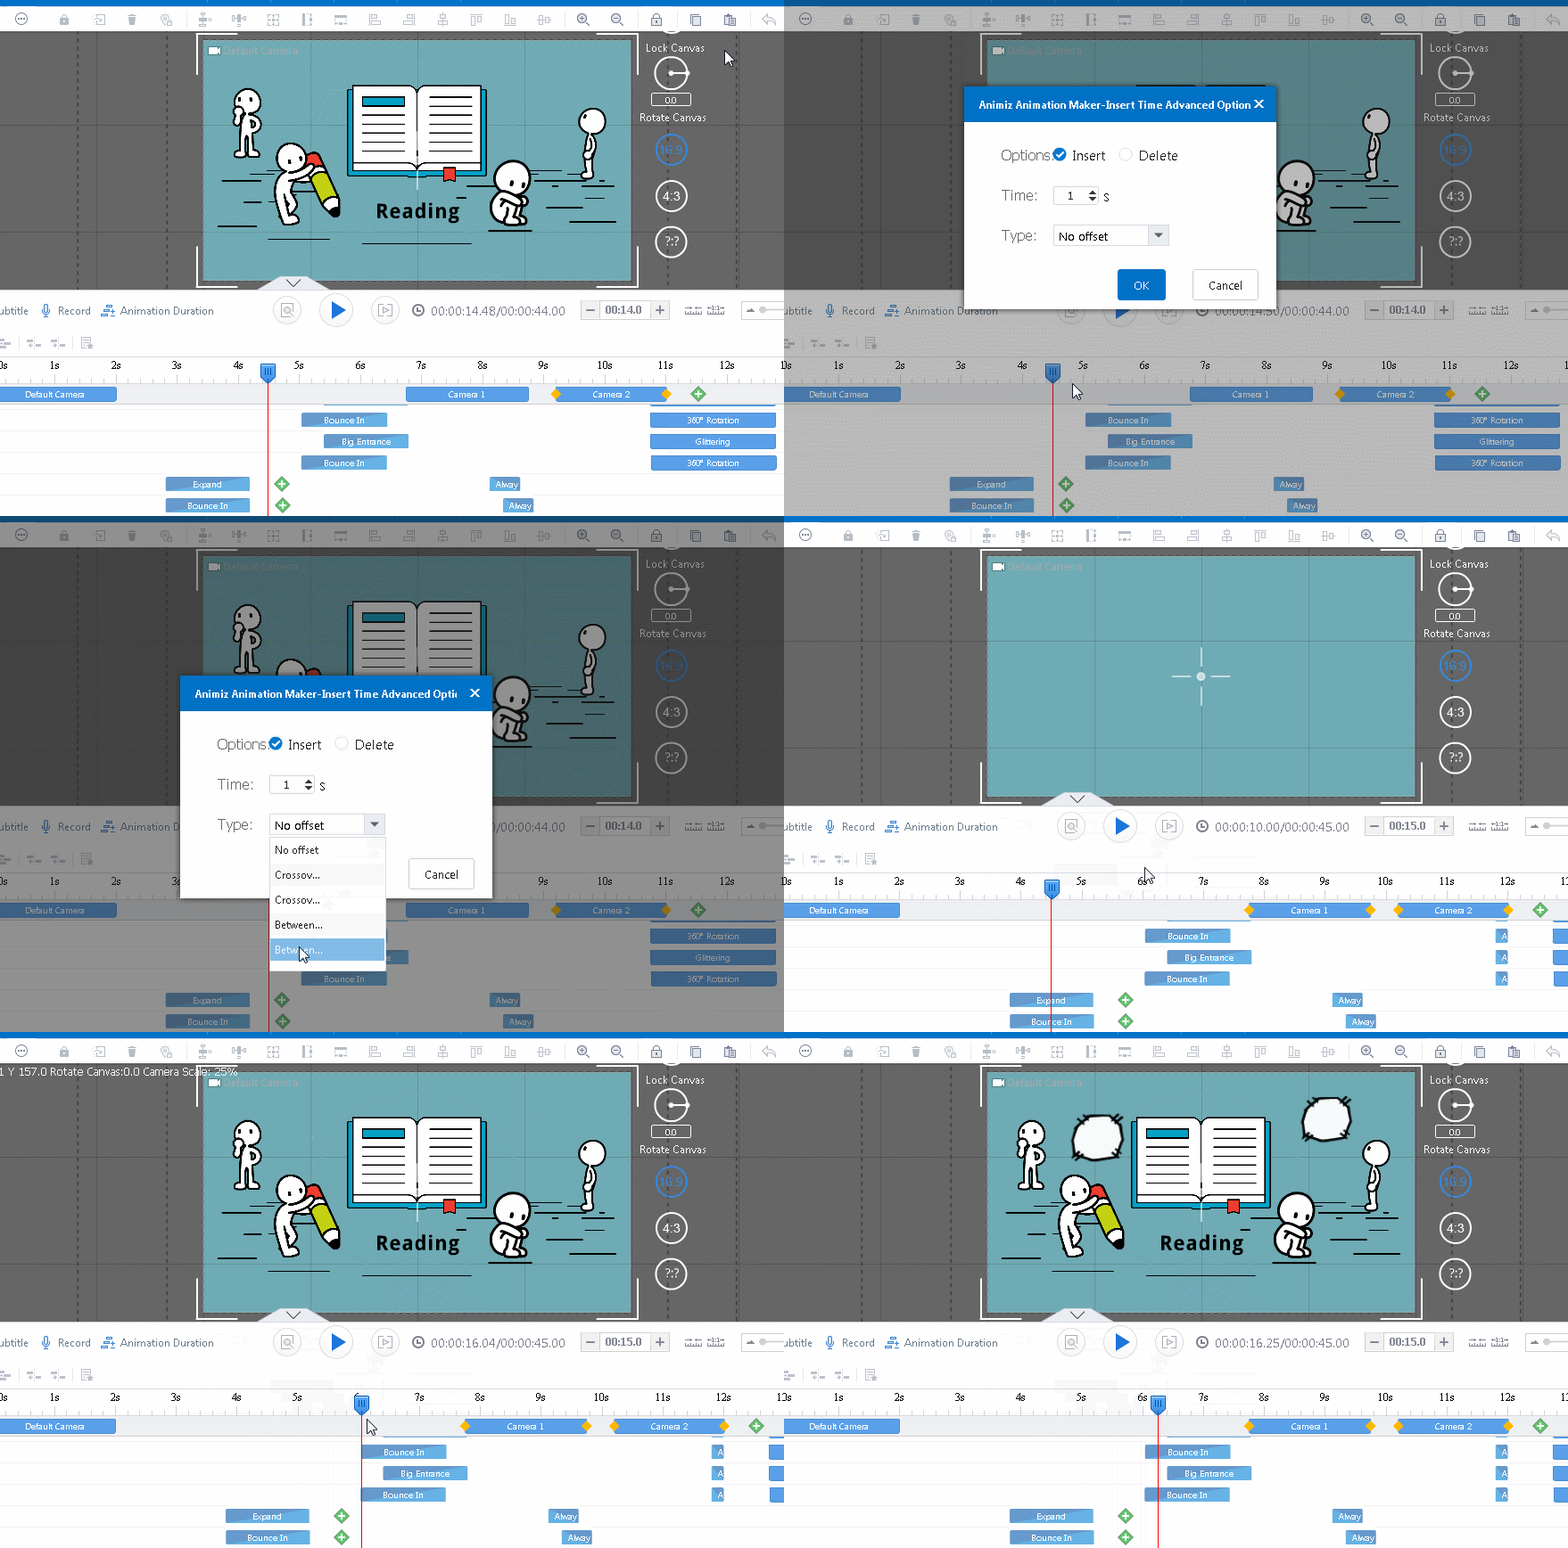
There are 5 powerful types to insert/delete time in timeline: No offset, Crossover-partial migration, Crossover-whole translation, Between-partial migration, Between-whole translation. Here, take “Insert” time as example.
1. No offset. Add seconds to current scene.
2. Crossover-partial migration.
3. Crossover-whole translation.
4. Between-partial migration.
5. Between-whole translation.
ⅱ.Add a Tag
Adding a tag for specific time is convenient for video editing and rearranging. The tag is movable but never change video animation duration, it is simply used for reference.
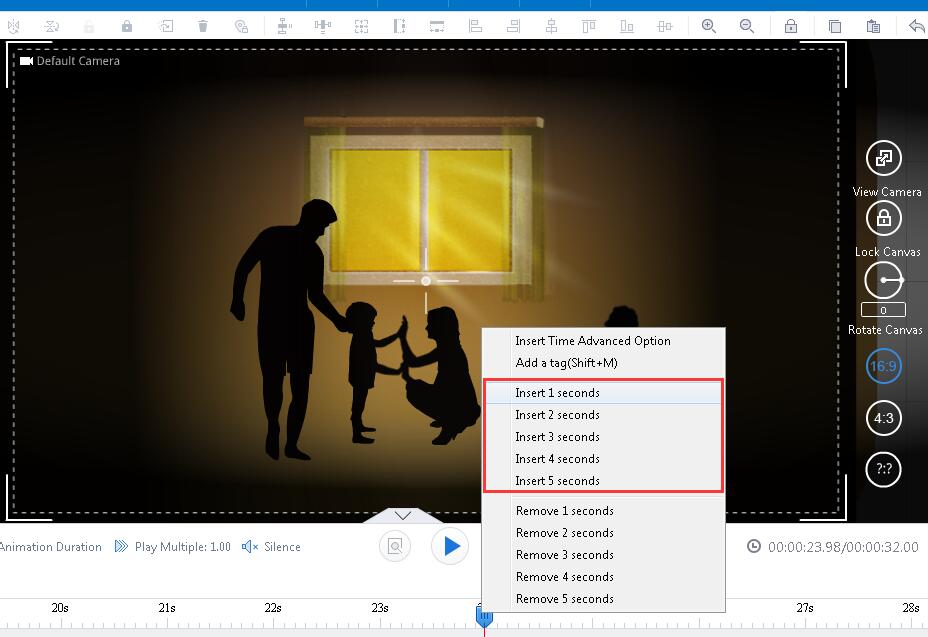
ⅲ. Insert Seconds
One click to insert 1-5 seconds in timeline.
ⅳ.Remove Seconds
One click to remove 1-5 seconds in timeline.
Ⅳ. Scene Time Settings
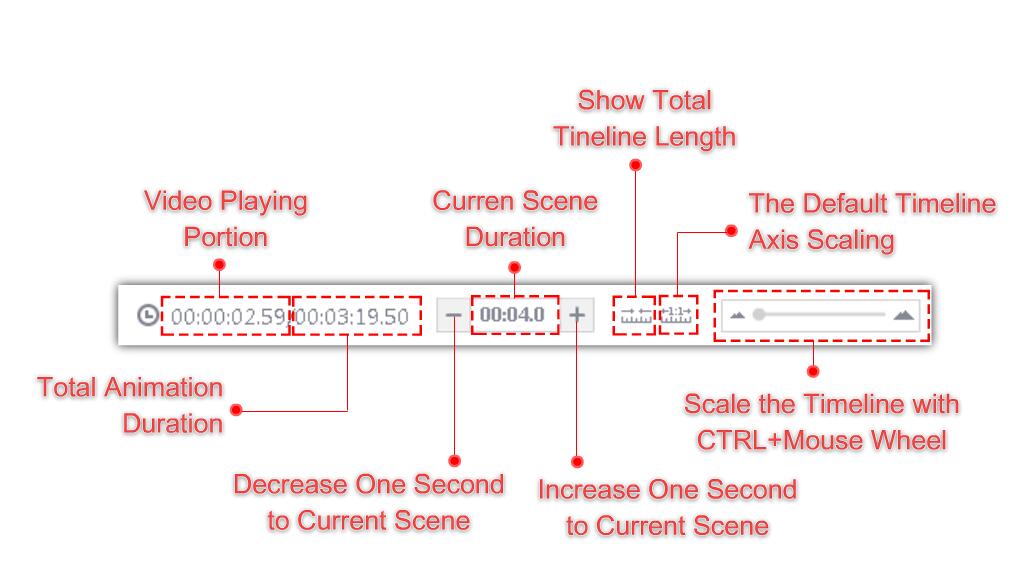
Animiz animation maker ensures everyone to easily customize scene time and scale the timeline for better video enjoyment.
Ⅴ. Objects-Animations
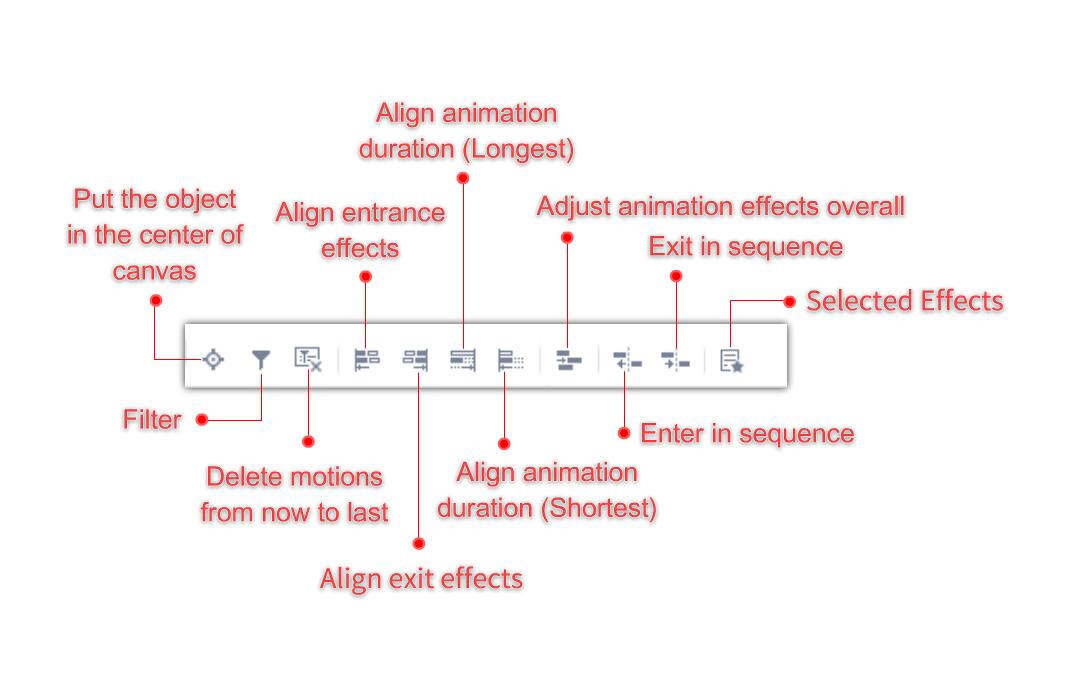
You are able to fully customize objects and animations in timeline to enrich video presentations. Hundreds of entrance/emphasis/exit animation effects will turn static objects into lifelike visual enjoyment. With too much objects added, Filter and Put the Object in the Center of Canvas buttons will do you a great favor to quickly locate specified object(s).
ⅰ. Put the object in the center of canvas. Click the button then added object will be quickly showed in the center of canvas.
ⅱ. Filter. Sort out eligible object(s) with appointed type.
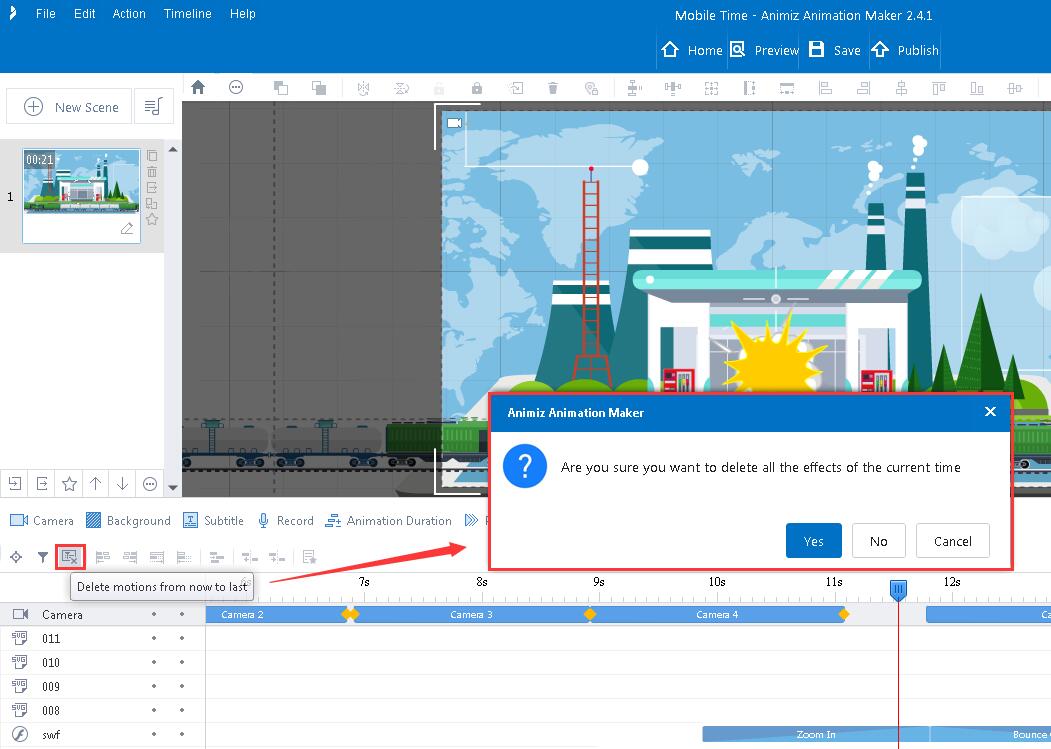
ⅲ. Delete motions from now to last. Move Playhead to specific point in timeline, click this button then you can delete all the effects now to last of the current time.
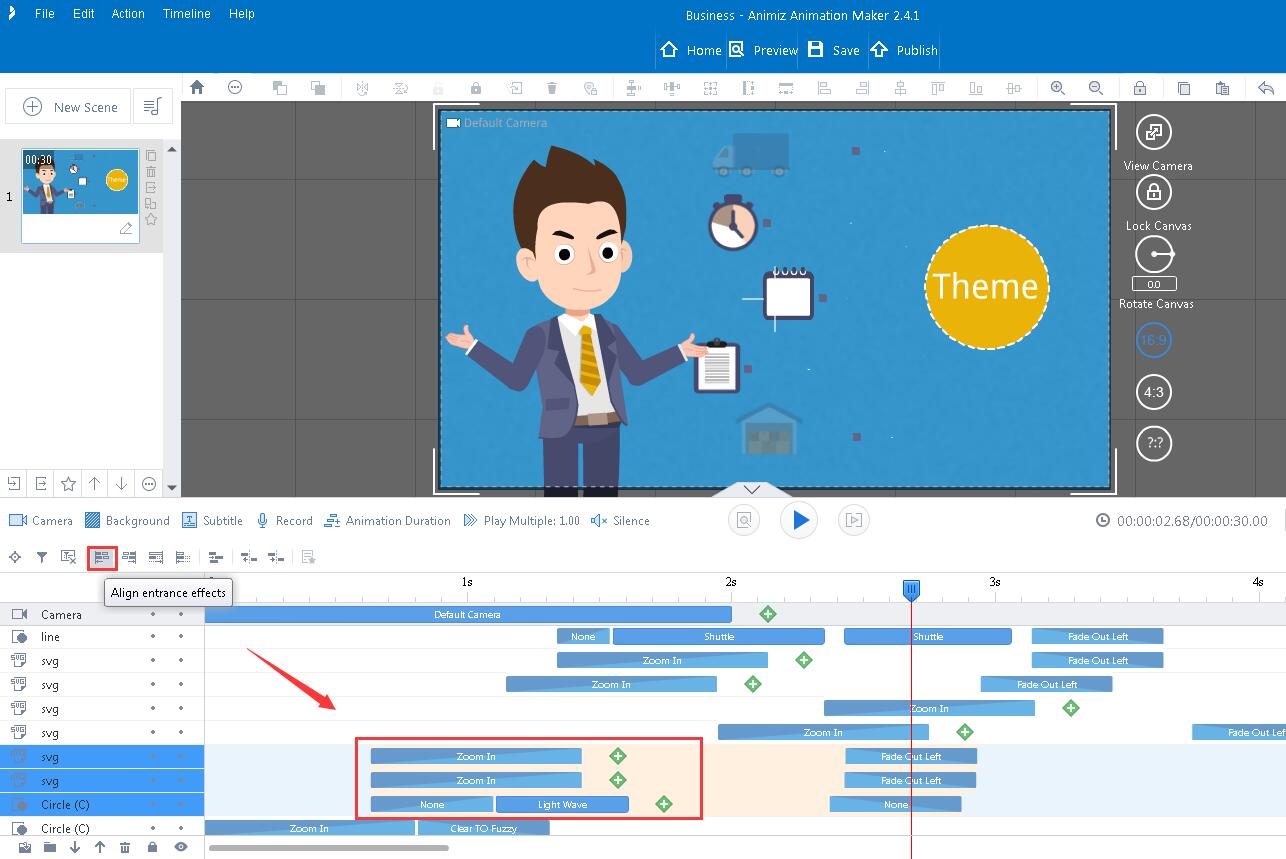
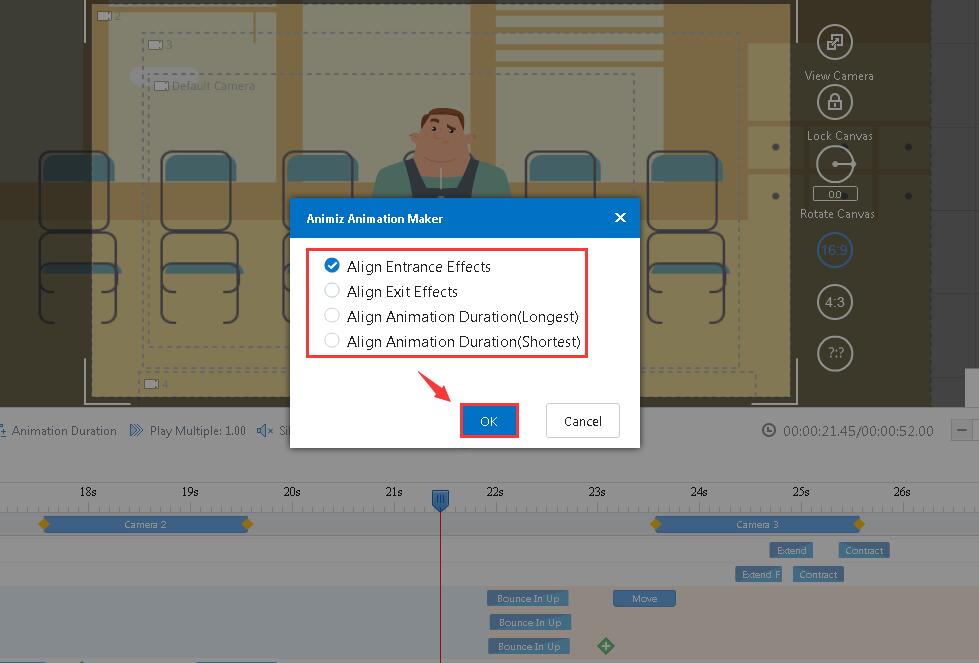
ⅳ. Align entrance/exit effects. Pressing the Shift key, at the same time click the mouse to select several objects, then you can align animations entrance/exit effects.
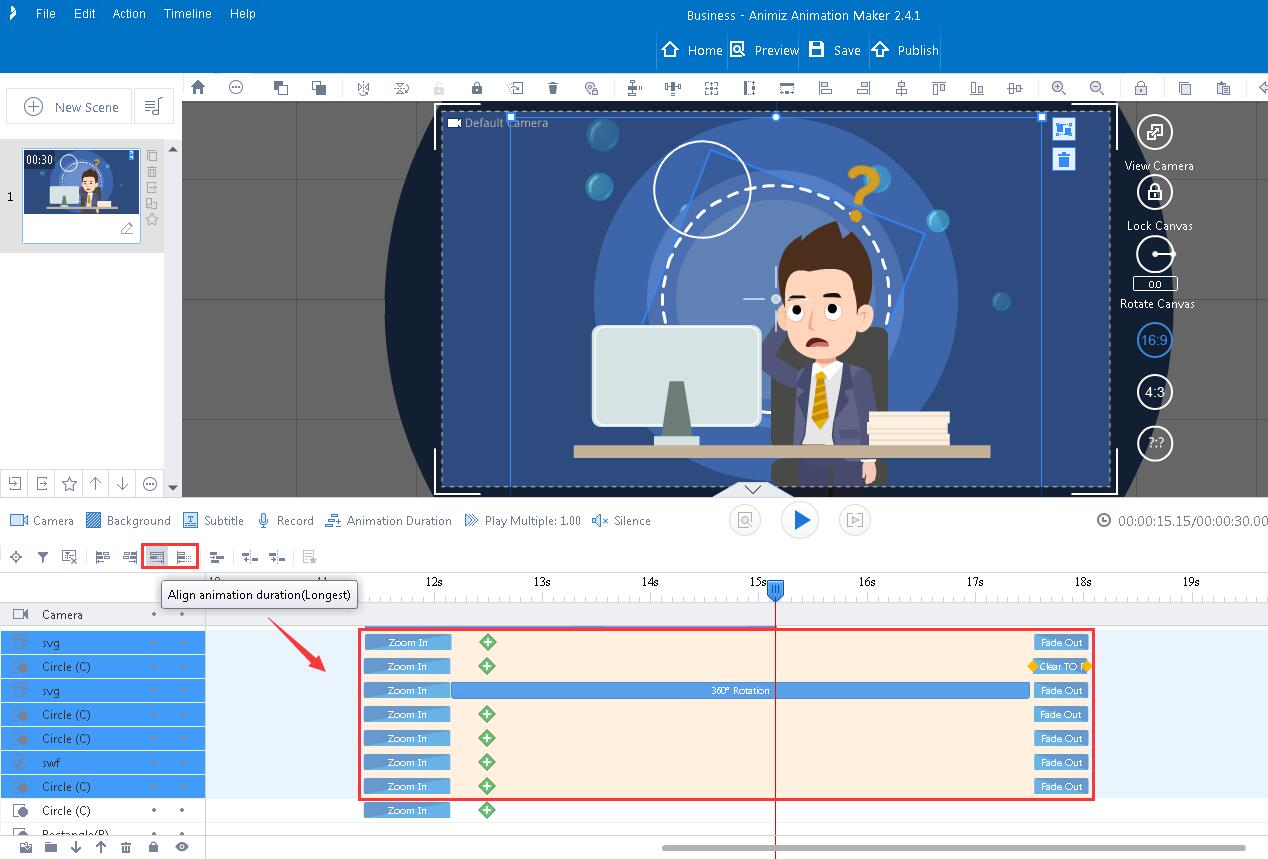
ⅴ. Align animation duration (Longest/Shortest). Click to unify different objects’ animation duration.
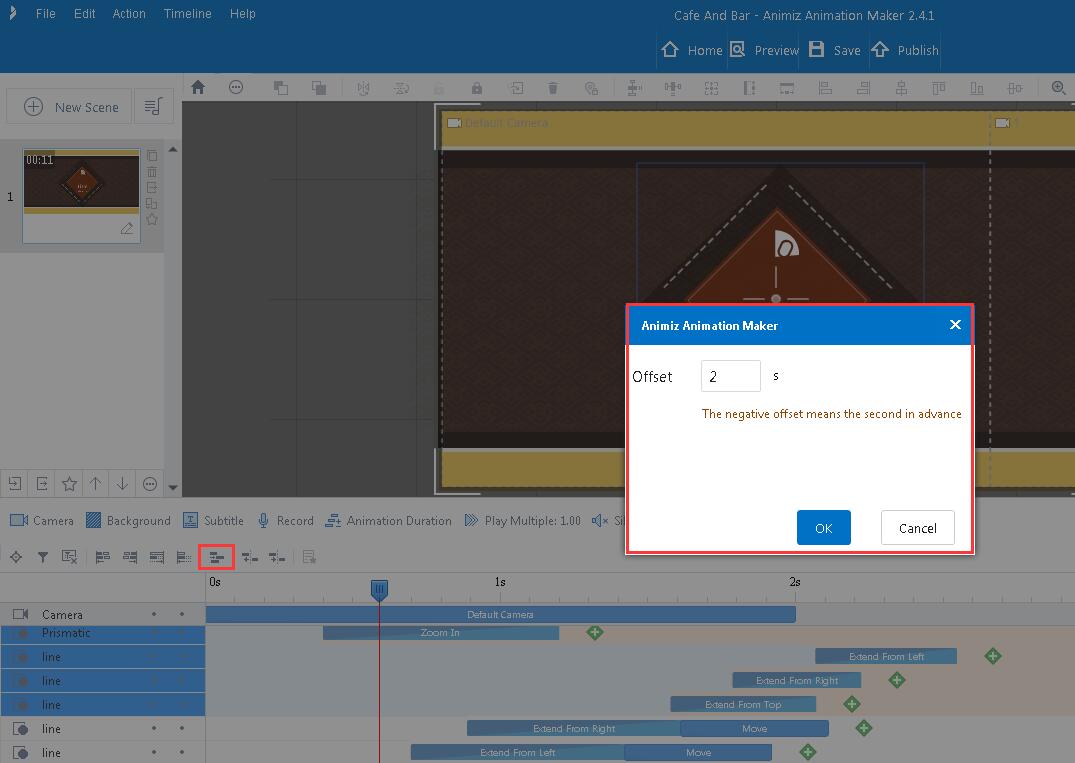
ⅵ. Adjust animation effects overall. Multiple objects’ animation effects will be adjusted at the same time. The negative offset means the second in advance.
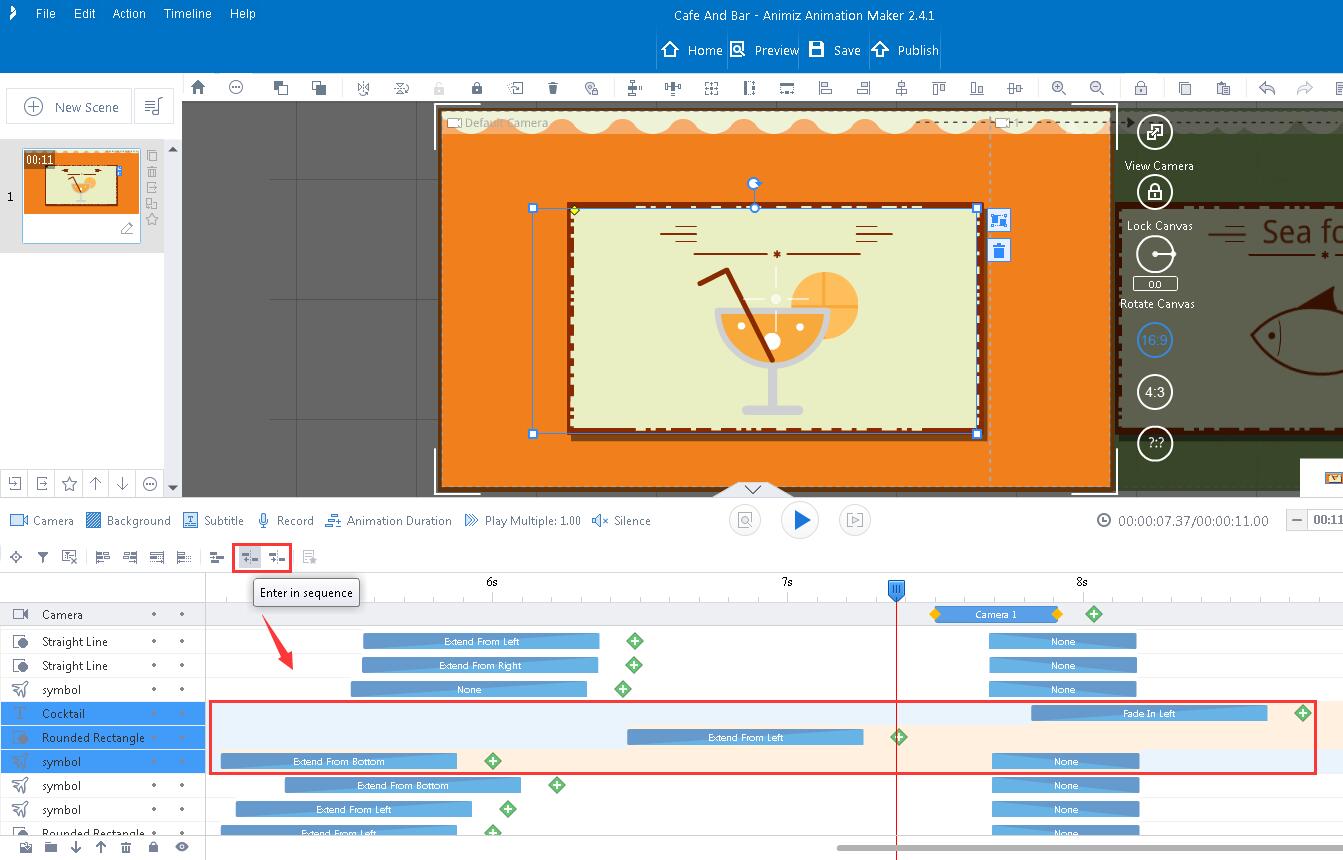
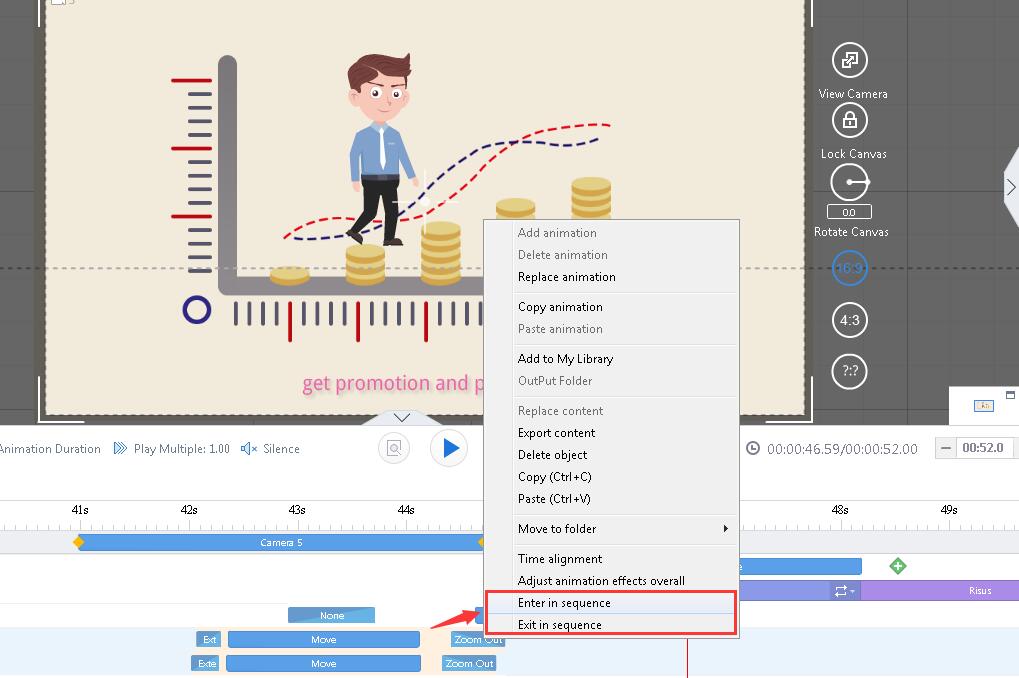
ⅶ. Enter/Exit in sequence. Hold the “Shift” key to select your target animation bars, set the offset (The offset can be negative) to make the selected animation effects enter/exit in sequence.
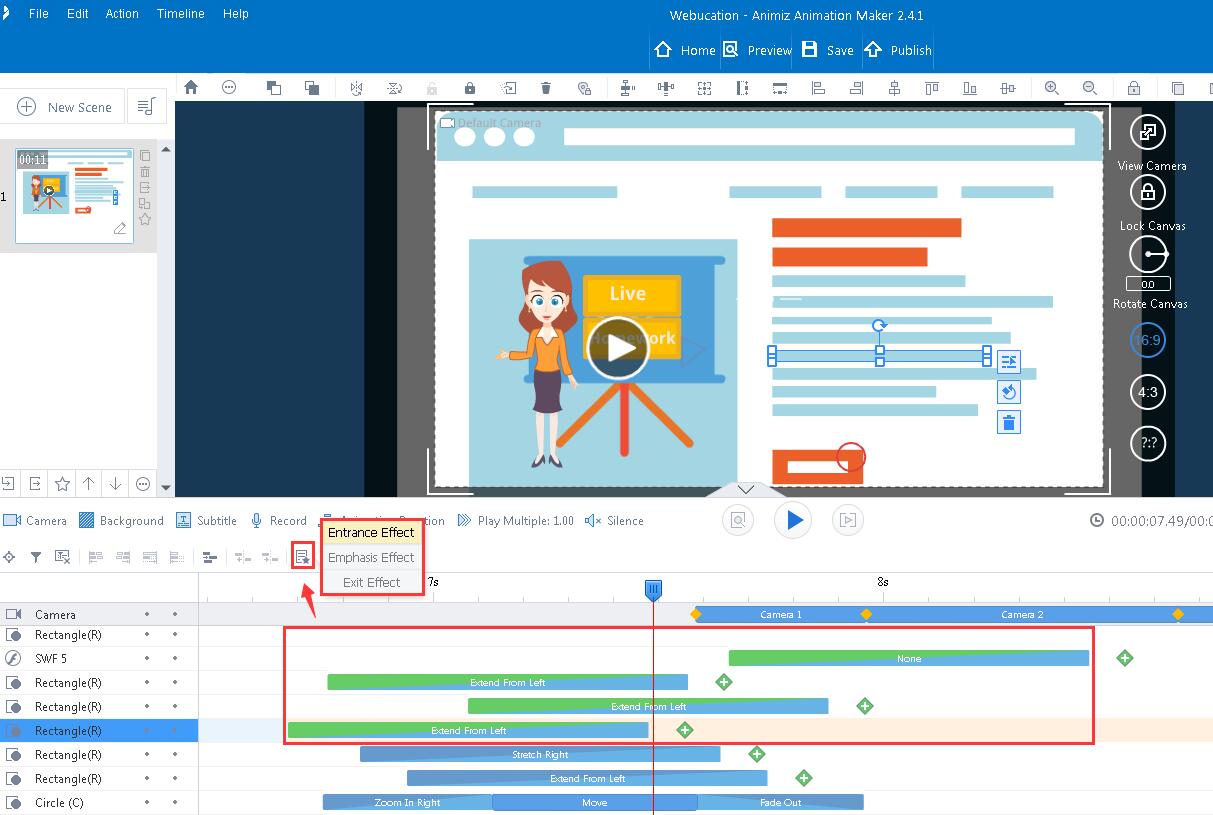
ⅷ. Selected effects. Press Shift+ Ctrl keys, click to select target animation bars, then you can batch change objects’ animation effects (Entrance Effect, Emphasis Effect, Exit Effect).
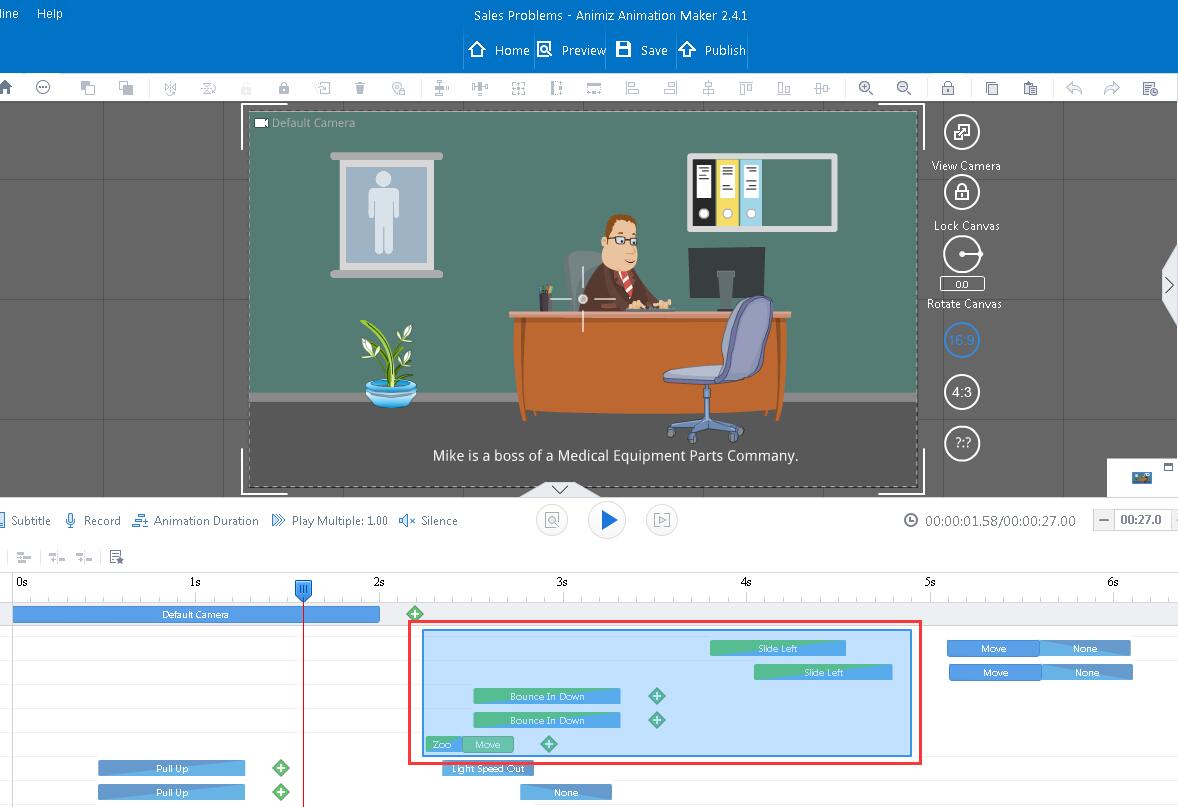
ⅸ. Select multiple animations with frame. Press Alt+ Left Mouse button, then you can select multiple animation effects by dragging a frame.
Ⅵ. Objects and Objects Editing
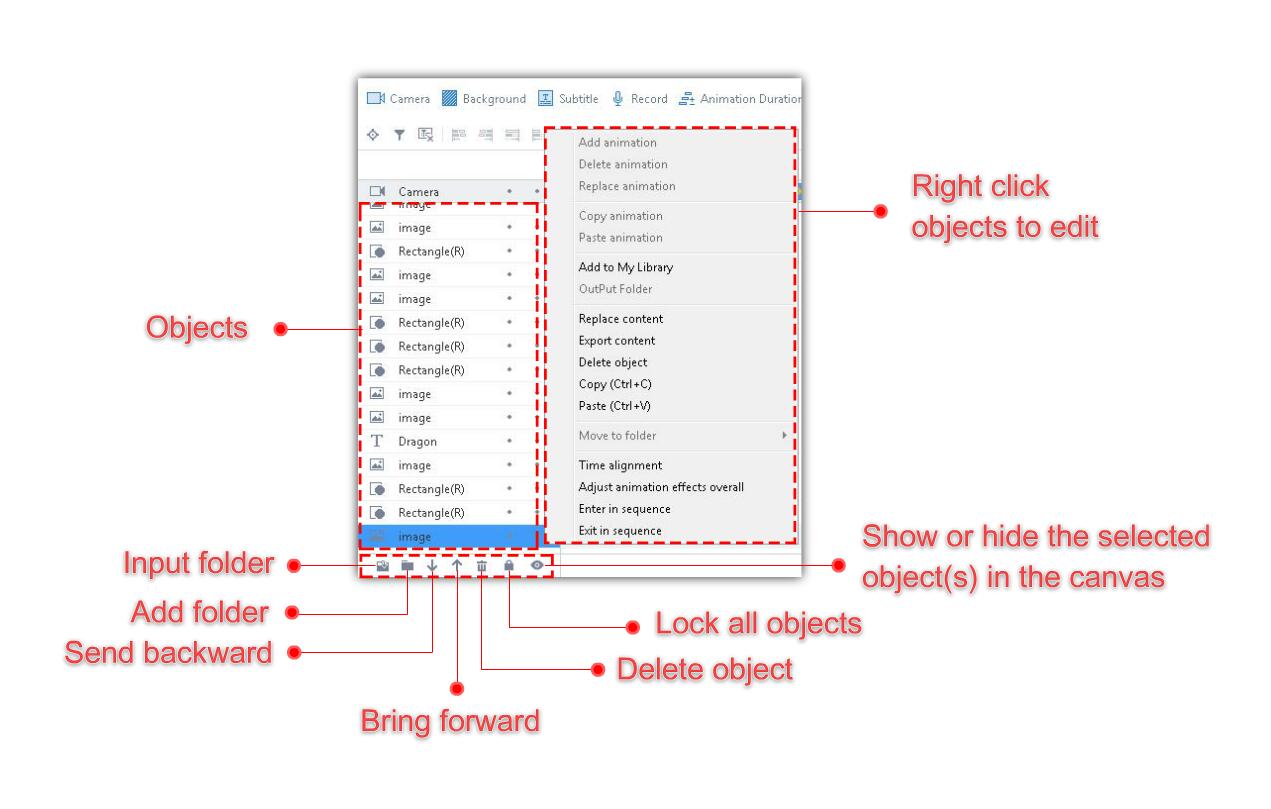
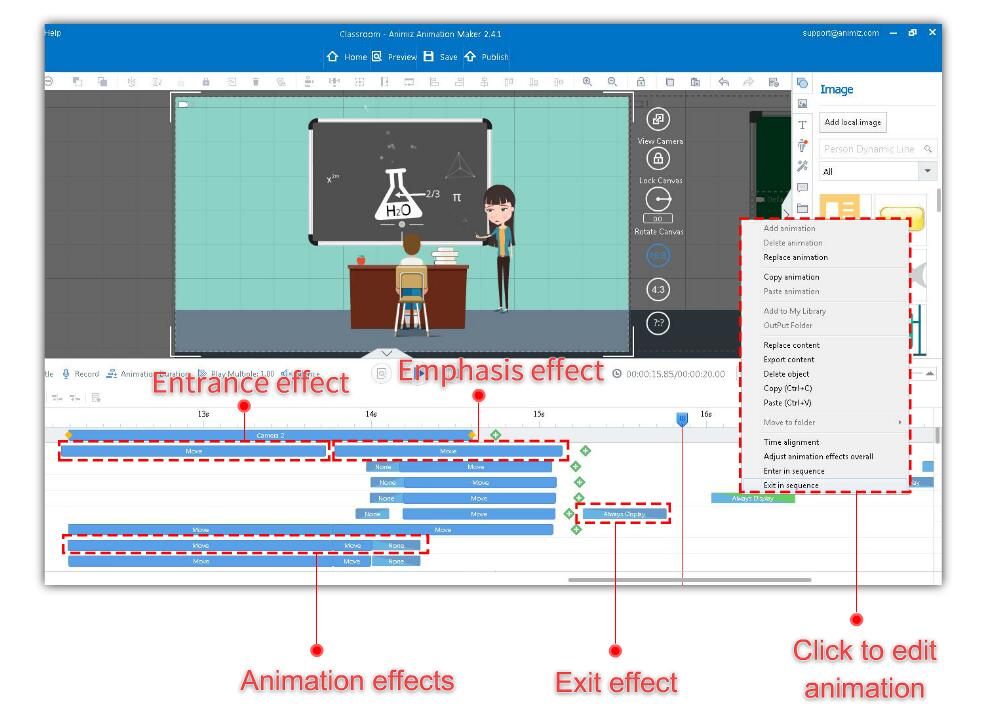
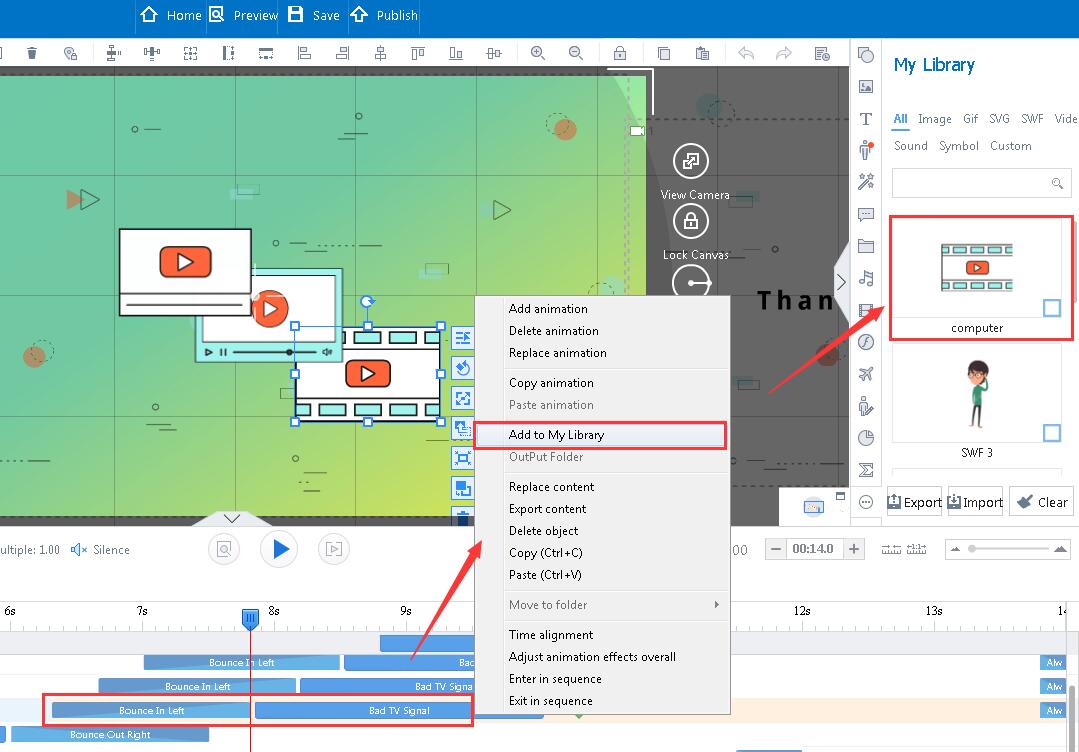
Animiz timeline lists added objects at the left side. Right click any of the object, you can have following settings, including Add to My Library, Replace content, Export content, Copy and Paste, Delete animation, Time alignment, Entrance/Exit in sequence and Adjust animation effects overall.
Besides, Animiz timeline provides more powerful features to edit objects. For example:
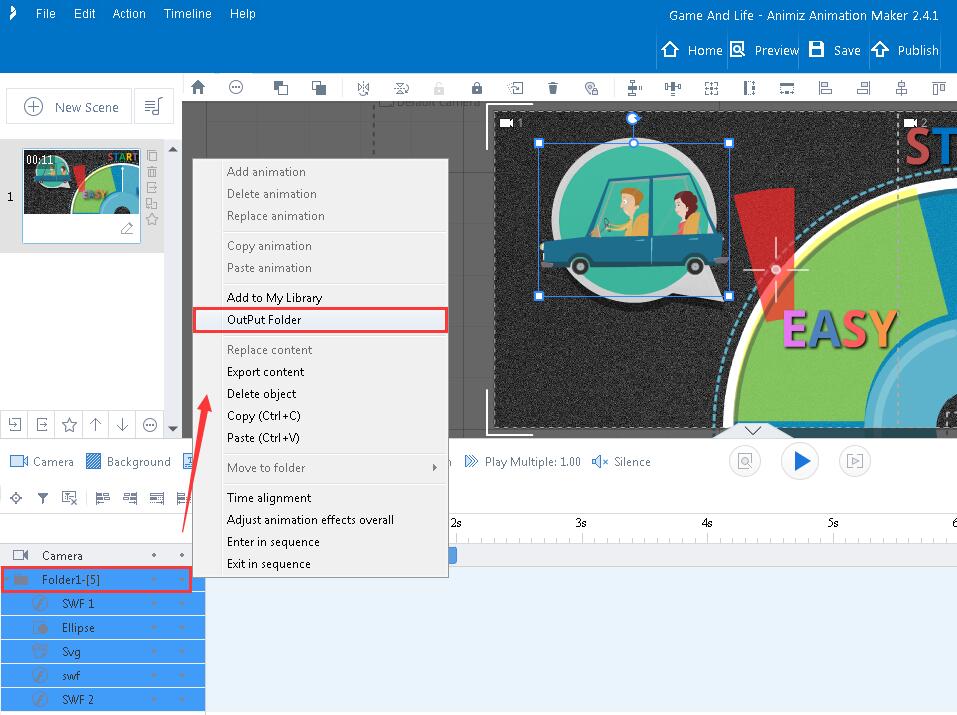
ⅰ. Output Folder
Output folder to local, the same objects and animations are good for future reuse.
ⅱ. Input Folder
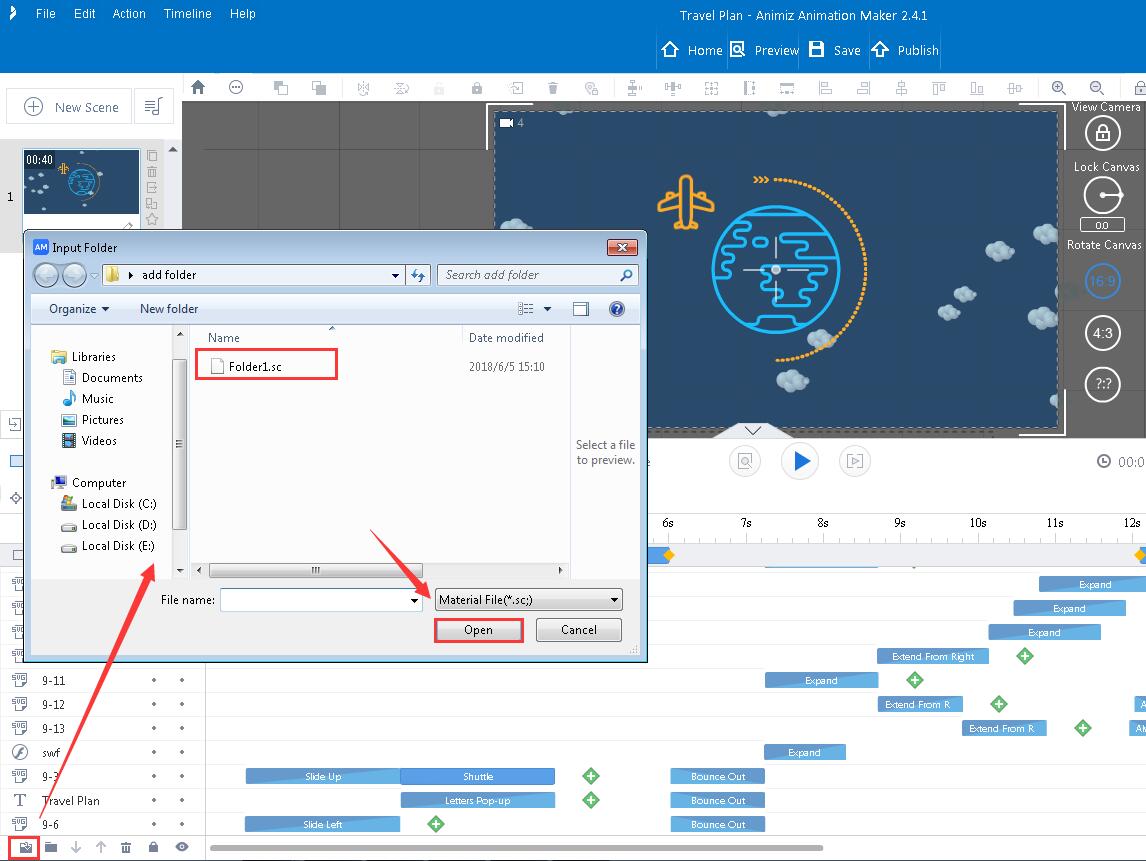
It is highly efficient to input folder (.sc file), batch adding multiple objects in timeline.
ⅲ. Add Folder
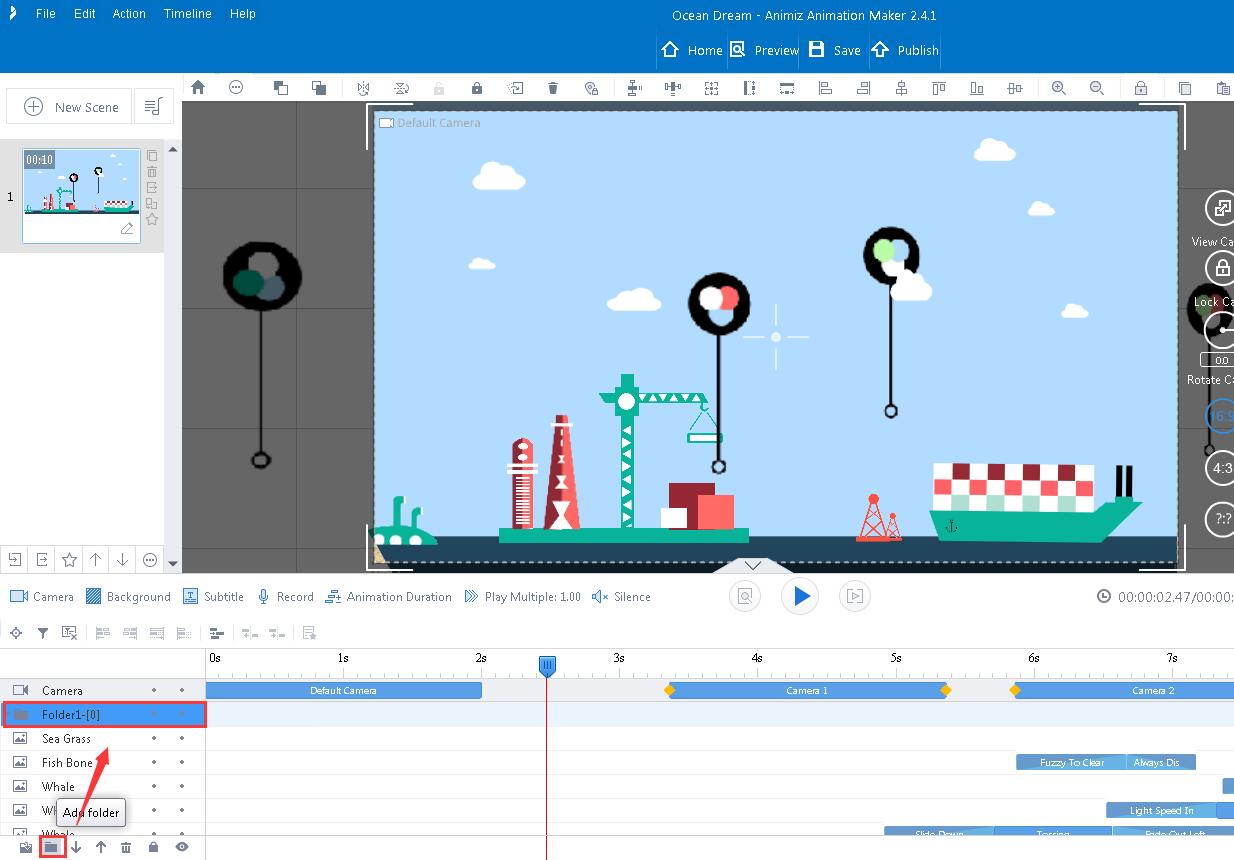
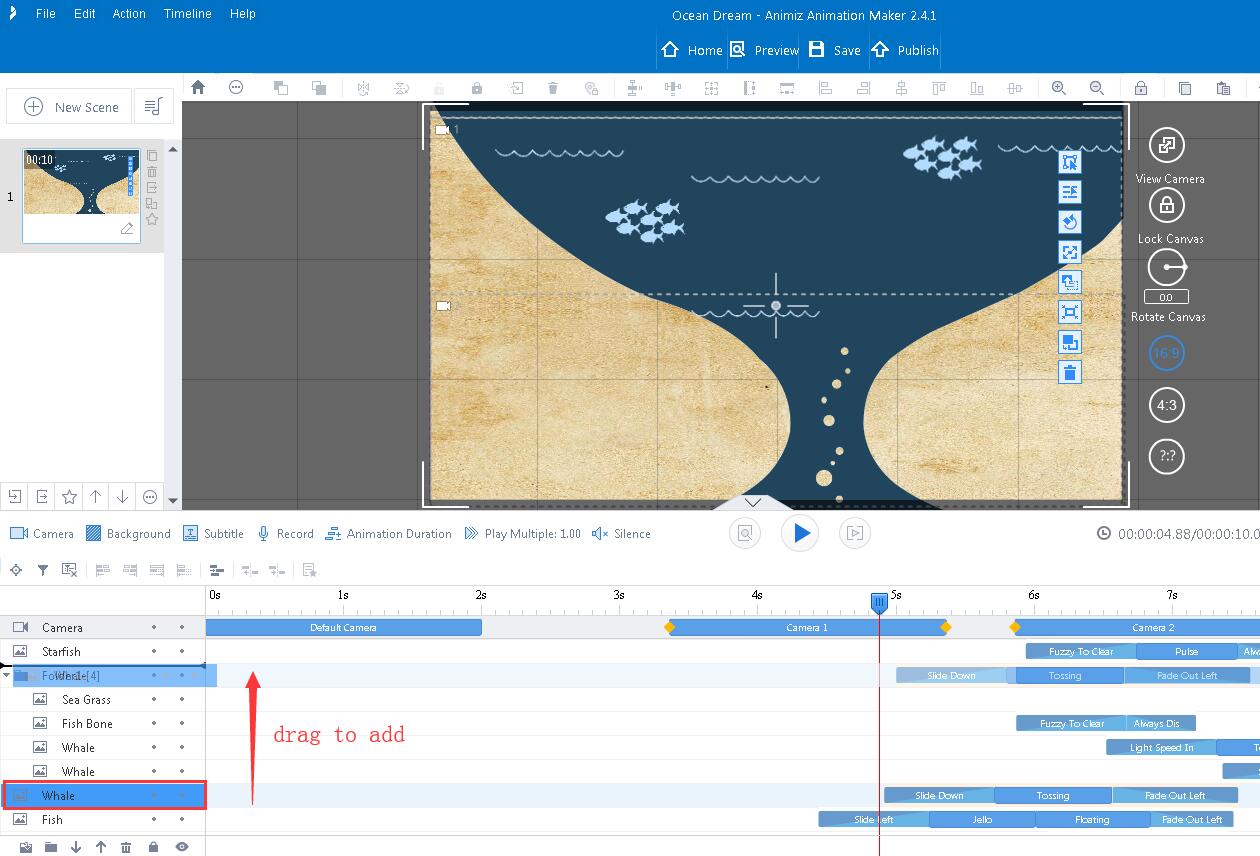
Edit Folder objects like a group element, moving, deleting, or editing are time-saving and high efficiency.
Double click to rename folder, drag objects in folder then they can be customized as a whole. More info visit:http://www.animiz.com/help-27.html.
ⅳ.Send backward/ Bring forward. Choose object(s) and click Send backward or Bring forward button can modify their layer order in timeline.
ⅴ.Delete object. Click to delete added object(s).
ⅵ.Lock all objects. One click to lock all objects, then added objects cannot be edited in canvas any more. More info visit:http://www.animiz.com/help-16.html.
ⅶ.Show or hide the selected object(s) in the canvas. Show/hide one object/all objects as needed for convenient video editing. More info visit: http://www.animiz.com/help-17.html.
Ⅶ. Animations
Different types of animation effects grouped into entrance, emphasis and exit to create awesome visual impact. More info visit:http://www.animiz.com/help-79.html.
ⅰ.Entrance effect. Double click on the animation bar and choose a suitable entrance animation effect for object.
ⅱ.Emphasis effect. One object can have multiple emphasis effects.
ⅲ.Exit effect.Choose from different types of exit effects, then edit advanced options.
ⅳ.Add animation. Click to add new animation effects for object(s) in the pop-up window.
ⅴ.Delete animation.Quick delete object’s animation effect.
ⅵ.Replace animation. Click to change added animation effect.
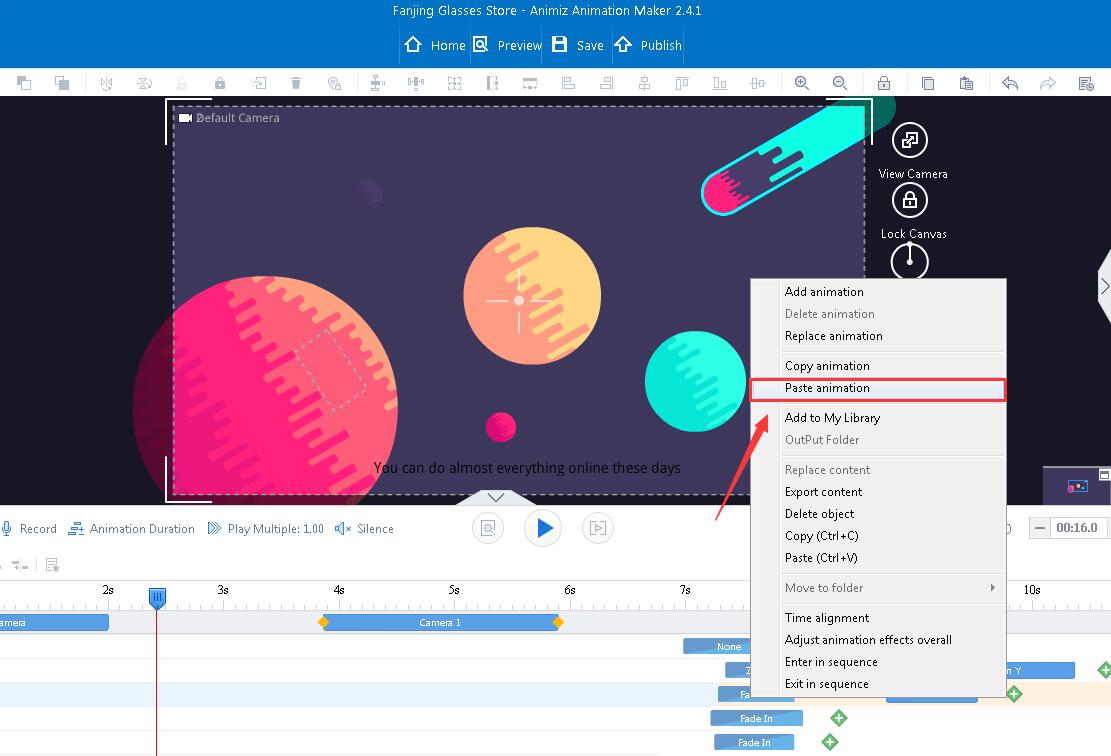
ⅶ.Copy/Paste animation.Copy an animation effect, you can easily add the same animation effect to other object (s) with Paste animation button. It is a good way to avoid repeating animation settings.
ⅷ.Add to My Library. Save used contents including videos, images and sounds in My Library, it is convenient to reuse these objects in new video presentations.
ⅸ. Replace content. Choose a local file to replace this object in the pop-up window.
ⅹ. Export content. Click to export object(s) to local. Customize file’s name as needed.
xi. Delete object. Directly delete object(s) in timeline.
xii. Copy/Paste. Add the same object(s) in timeline.
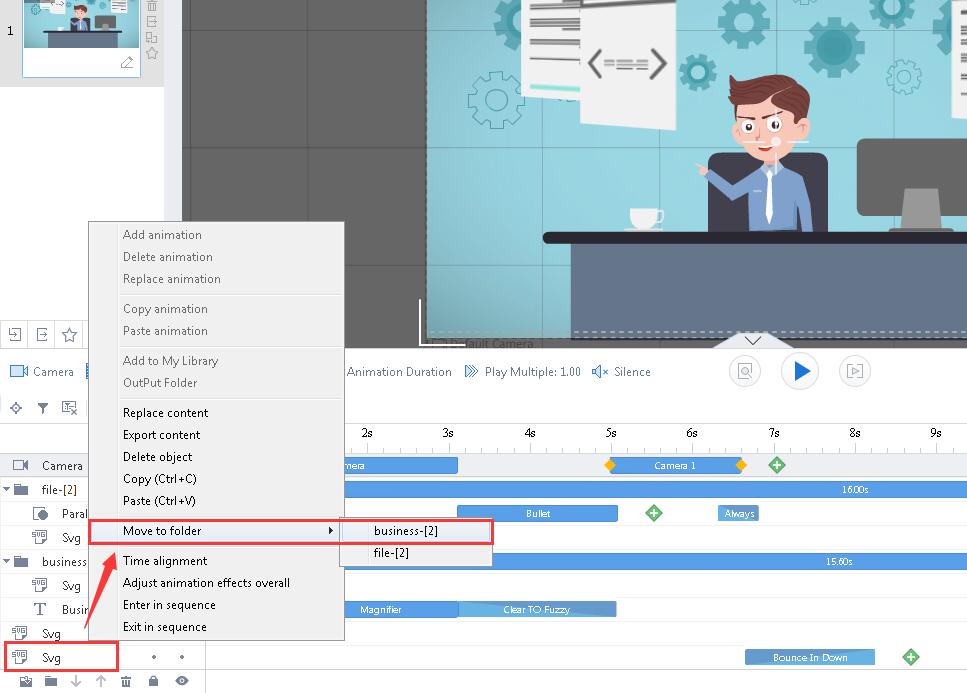
xiii. Move to folder. Move object(s) to suitable folder in timeline for better arrangement.
xiv. Time alignment. Align objects’ animation effects by selecting time alignment: align entrance effects, align exit effects, align animation duration (longest), and align animation duration (shortest). More info visit: http://www.animiz.com/help-51.html, http://www.animiz.com/help-78.html.
xv. Adjust animation effects overall: http://www.animiz.com/help-53.html.
xvi. Enter/Exit in sequence:http://www.animiz.com/help-54.html.
Previous:How to add record?

